Use a Mac at Night? Save Your Eyes & Sanity with Flux
키워드 : Eye Strain, 블루컷, color calibration

Showing posts with label OS X. Show all posts
Showing posts with label OS X. Show all posts
Saturday, June 11, 2016

Saturday, May 28, 2016
맥에서 dock 의 어플리케이션 폴더 위치 빠르게 찾아가는 법
Command click 하면 됨. (Show in Finder 와 같은 기능)
키워드 : application, folder, location, shortcut
키워드 : application, folder, location, shortcut
Friday, May 20, 2016
OS X terminal 에서 현재 폴더로 Finder 여는 법
터미널에서
open .
하면 됨
키워드 : directory, cd, folder, 디렉토리, 파인더
레퍼런스 : Open Finder in Current Folder from Terminal
open .
하면 됨
키워드 : directory, cd, folder, 디렉토리, 파인더
레퍼런스 : Open Finder in Current Folder from Terminal
Friday, May 13, 2016
OS X El Capitan 의 bootable disk 만드는 법
OS X El Capitan 의 bootable disk 만드는 법
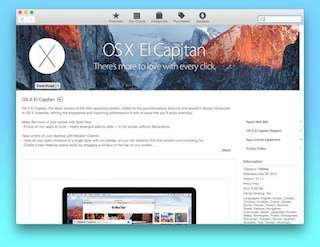
How to do a clean install of OS X El Capitan
How to create a bootable OS X 10.11 El Capitan USB drive
- Download OS X El Capitan. After the download is complete, Install OS X El Capitan will be available in your Applications folder. A setup wizard should have appeared by now -- you can close it.
- Connect the USB drive to your Mac.
- Using Disk Utility (it is typically found in the Other folder, under Launchpad), format the USB drive as Mac OS Extended (Journaled), and name it OSXElCapitan. This can be done from the Erase tab within the app; make sure that there are no multiple partitions (turn to the Partition tab to verify and correct this).
- Open Terminal (it is found in the same folder as the Disk Utility app).
- Use (paste) the following command: sudo /Applications/Install\ OS\ X\ El\ Capitan.app/Contents/Resources/createinstallmedia --volume /Volumes/OSXElCapitan --applicationpath /Applications/Install\ OS\ X\ El\ Capitan.app --nointeraction.
- Type in your user password, when required, to start the process.
- Restart your Mac and hold down the Option key immediately. When your machine boots up, choose the USB drive that says "Install OS X El Capitan"
- Select "Disk Utility" and then select your main hard drive. Press "Erase" on the volume. Remember, this will erase EVERYTHING on your machine.
- Go back to the main menu and choose "Install OS X." Select your internal hard drive when prompted and continue with the installation.
How to do a clean install of OS X El Capitan
How to create a bootable OS X 10.11 El Capitan USB drive
Sunday, December 20, 2015
OS X 스크린샷 저장 위치 바꾸는 법
예를 들어 데스크탑을 default 저장 위치로 만든다면, 터미널에서 다음과 같이 해준다.
출처 : The Complete Guide to Mac OS X Screenshots
$ defaults write com.apple.screencapture location /Users/[username]/Desktop키워드 : screen shots, capture
$ killall SystemUIServer
출처 : The Complete Guide to Mac OS X Screenshots
Friday, November 20, 2015
Thursday, October 22, 2015
Wednesday, September 23, 2015
현재 어플리케이션의 도큐멘트 윈도우들을 다 보는 단축키 (OS X)
Ctrl + Down Arrow (View Windows in the Current App)
-> 이것은 미션콘트롤 관련 단축키로 이것과 짝이 되는 단축키는 다음과 같다
Ctrl + Up Arrow (Enter Mission Control)
키워드 : hotkey, shortcut
레퍼런스 : MAC KEYBOARD SHORTCUTS
-> 이것은 미션콘트롤 관련 단축키로 이것과 짝이 되는 단축키는 다음과 같다
Ctrl + Up Arrow (Enter Mission Control)
키워드 : hotkey, shortcut
레퍼런스 : MAC KEYBOARD SHORTCUTS
Monday, April 27, 2015
OS X 의 Notes 를 아이폰과 sync 하는 법
맥에서 Notes를 열고
메뉴 > Notes > Accounts 에서
노트를 share 하고자 하는 계정을 선택한다.
To sync your Notes to your Mac running OSX, first launch the Notes app on your computer. Then, select “Notes” from the dropdown menu at the top of the screen and select “Accounts.” In the accounts section you will be able to select which email accounts you want to share with your Notes app.
키워드 : iphone, 동기화, 노트
출처 : PadGadget’s iPad Tips: Tips & Tricks – Syncing Notes Between Devices
메뉴 > Notes > Accounts 에서
노트를 share 하고자 하는 계정을 선택한다.
To sync your Notes to your Mac running OSX, first launch the Notes app on your computer. Then, select “Notes” from the dropdown menu at the top of the screen and select “Accounts.” In the accounts section you will be able to select which email accounts you want to share with your Notes app.
키워드 : iphone, 동기화, 노트
출처 : PadGadget’s iPad Tips: Tips & Tricks – Syncing Notes Between Devices
Monday, April 20, 2015
그림을 loop 되는 slide show 로 보는 방법
보려는 그림을 선택한 후 Command+Option+Y 로 Quick Look 을 띄우면 된다.
보려는 그림을 선택한 후 Preview 로 띄우면 loop 는 되지 않음
키워드 : 루프, os x, 슬라이드 쇼
레퍼런스 : 9 Tricks for the Full Screen Slideshow Feature in OS X
보려는 그림을 선택한 후 Preview 로 띄우면 loop 는 되지 않음
키워드 : 루프, os x, 슬라이드 쇼
레퍼런스 : 9 Tricks for the Full Screen Slideshow Feature in OS X
Sunday, April 5, 2015
Friday, February 27, 2015
OS X에서 Ctrl + down arrow 의 역할
현재 어플리케이션의 모든 열린 윈도우를 보여준다.
F3 Mission control 버튼과 비슷하나 현재 app 에 대해서만 해준다는게 다른 점.
키워드 : 미션 컨트롤, windows, window, application, app, shortcut, hotkey
출처 : OS X Mavericks: Zoom to Mission Control
F3 Mission control 버튼과 비슷하나 현재 app 에 대해서만 해준다는게 다른 점.
키워드 : 미션 컨트롤, windows, window, application, app, shortcut, hotkey
출처 : OS X Mavericks: Zoom to Mission Control
Friday, November 7, 2014
맥-아이폰 연결하는 무지개다리 : OS X 요세미티
네이버캐스트 [용어로 보는 IT] 맥-아이폰 연결하는 무지개다리 : OS X 요세미티
‘핸드오프’…아이폰 화면에서 맥 모니터로
아이폰에서 사파리 응용프로그램(앱)을 열면, 맥 바탕화면 아이콘 독 왼쪽에 자동으로 사파리 아이콘이 나타난다. 맥 화면에 나타난 아이콘을 누르면, 아이폰에서 보던 웹페이지를 바로 열 수 있다.
키워드 : yosemite, iphone, mac
‘핸드오프’…아이폰 화면에서 맥 모니터로
아이폰에서 사파리 응용프로그램(앱)을 열면, 맥 바탕화면 아이콘 독 왼쪽에 자동으로 사파리 아이콘이 나타난다. 맥 화면에 나타난 아이콘을 누르면, 아이폰에서 보던 웹페이지를 바로 열 수 있다.
키워드 : yosemite, iphone, mac
Sunday, September 28, 2014
OS X 다시 까는 법
하드 안지우고 OS만 다시 깔기 (데이터는 그대로 남음) : OS X Mavericks: Reinstall OS X
1. 컴퓨터를 restart 하고, command + R 을 누르고 있는다.
2. Reinstall OS X 를 선택한다.
3. 지시에 따라 인스톨할 디스크를 선택하고 앱스토어 아이디와 패스워드를 입력한다.
포맷하고 깔기 : OS X Mavericks: Erase and reinstall OS X
How to make a bootable Mavericks install drive
How to make a bootable install drive for Macs that shipped with Mavericks
키워드 : disk format, disk utility, app store, hard disk, 하드 디스크
1. 컴퓨터를 restart 하고, command + R 을 누르고 있는다.
2. Reinstall OS X 를 선택한다.
3. 지시에 따라 인스톨할 디스크를 선택하고 앱스토어 아이디와 패스워드를 입력한다.
포맷하고 깔기 : OS X Mavericks: Erase and reinstall OS X
How to make a bootable Mavericks install drive
How to make a bootable install drive for Macs that shipped with Mavericks
키워드 : disk format, disk utility, app store, hard disk, 하드 디스크
Saturday, September 27, 2014
맥 OS X에서 시스템 로그 및 QuickLook 캐시 지우기
Save Space On Your Hard Drive – Delete System Logs And QuickLook Cache Files [OS X Tips]
Rob LeFebvre (6:00 am PDT, May 16th 2013)
그런데 이걸 수행하면 파인더 및 사파리가 망가지는 등 문제를 많이 일으킨다고 함.
키워드 : 최적화
Rob LeFebvre (6:00 am PDT, May 16th 2013)
그런데 이걸 수행하면 파인더 및 사파리가 망가지는 등 문제를 많이 일으킨다고 함.
키워드 : 최적화
Friday, November 8, 2013
OS X Mavericks 에서 도입된 tab 안쓰는 법
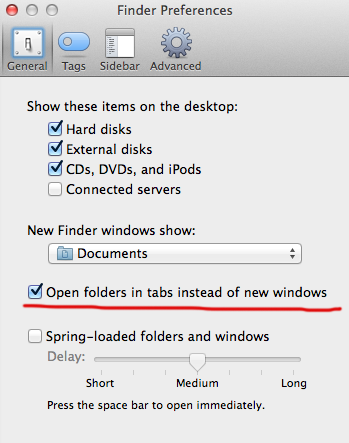
Command + double click 해서 폴더 열때 탭에서 안열리게 하는 법
Command + , 로 파인더 preferences 로 들어가서
다음의 체크를 꺼주면 된다.
키워드 : 탭 사용 안하기, 사용 안하는 법, open folder
레퍼런스 : How Finder Tabs work in OS X Mavericks
Command + , 로 파인더 preferences 로 들어가서
다음의 체크를 꺼주면 된다.
키워드 : 탭 사용 안하기, 사용 안하는 법, open folder
레퍼런스 : How Finder Tabs work in OS X Mavericks
Thursday, October 24, 2013
Saturday, October 5, 2013
OS X 설치 CD
맥 OS 재설치 하는 법
2011년 8월 이후에 구입한 모든 맥은 OS 10.7이 설치되어 있습니다.(2012년 8월부터는 10.8이 설치되어 있습니다.) OS 10.7~10.8부터는 OS시디가 제공되지 않고 하드안에 OS 설치 프로그램이 파티션되어서 들어 있습니다. 그래서 부팅시 옵션키를 길게 누르고 계시면 부팅OS를 고르는 창이 나오는데 여기서 리커버리 디스크를 선택해서 부팅하시면 OS시디로 부팅된 것과 같은 상황이 되는 겁니다. 또한 하드디스크를 교체 하시는 경우에는 부팅시 옵션+커맨드+R를 누르고 계시면 인터넷 복구모드로 들어가서 애플 서버를 통해 하드에 다시 리커버리 디스크를 생성받을수 있어서 결국 시디가 없어도 됩니다.
출처 : 아이맥 샀는데요 원래 맥os 인스톨시디 안주나요
2011년 8월 이후에 구입한 모든 맥은 OS 10.7이 설치되어 있습니다.(2012년 8월부터는 10.8이 설치되어 있습니다.) OS 10.7~10.8부터는 OS시디가 제공되지 않고 하드안에 OS 설치 프로그램이 파티션되어서 들어 있습니다. 그래서 부팅시 옵션키를 길게 누르고 계시면 부팅OS를 고르는 창이 나오는데 여기서 리커버리 디스크를 선택해서 부팅하시면 OS시디로 부팅된 것과 같은 상황이 되는 겁니다. 또한 하드디스크를 교체 하시는 경우에는 부팅시 옵션+커맨드+R를 누르고 계시면 인터넷 복구모드로 들어가서 애플 서버를 통해 하드에 다시 리커버리 디스크를 생성받을수 있어서 결국 시디가 없어도 됩니다.
출처 : 아이맥 샀는데요 원래 맥os 인스톨시디 안주나요
Saturday, August 17, 2013
OS X 에서 타이머로 스크린샷 찍는 법
OS X 에 기본으로 탑재되어 있는 Grab 유틸리티를 이용한다.
메뉴에서 Timed Screen 명령을 실행하고 타이머를 시작하면 10초 이후에 스크린샷이 찍힘.
레퍼런스 : Take a Timed Screen Shot in Mac OS X
키워드 : Screenshot, screen capture, Utilities, timer
메뉴에서 Timed Screen 명령을 실행하고 타이머를 시작하면 10초 이후에 스크린샷이 찍힘.
레퍼런스 : Take a Timed Screen Shot in Mac OS X
키워드 : Screenshot, screen capture, Utilities, timer
Saturday, July 20, 2013
OS X에서 다이얼로그 박스 버튼들을 tab 키로 옮겨다니는 방법
디폴트로는 탭이 안먹히는데 Preference 에서 다음과 같이 해주면 된다.

링크 : Use the Tab Key to Switch Between Dialog Buttons in Mac OS X
링크 : Use the Tab Key to Switch Between Dialog Buttons in Mac OS X
Subscribe to:
Posts (Atom)