질문 : 라인번호를 디폴트로는 표시해주는 방법은?
요약 : Preference > Appearance > Line numbers 에 체크.
구버전은 Preference > Text Status Display > Show line numbers 에 체크하면 된다.
Friday, December 31, 2010
Thursday, December 30, 2010
Mac OS X 에서 심볼을 입력하는 shortcut
질문 : 심볼을 간편히 입력하는 핫키는 없나?
요약 : Option + Command + T 를 써볼것.
부연 : 다 되는건 아니다. TextEdit 나 blogger 등 되는 곳도 있는데, TextWrangler 등 안되는 곳도 있다. 안되는 곳이 더 많은 듯 하므로, 되는 곳에서 활용할 것.
요약 : Option + Command + T 를 써볼것.
부연 : 다 되는건 아니다. TextEdit 나 blogger 등 되는 곳도 있는데, TextWrangler 등 안되는 곳도 있다. 안되는 곳이 더 많은 듯 하므로, 되는 곳에서 활용할 것.
Mac OS X 에서 System Preferences 를 빨리 여는 핫키
질문 : System Preferences 를 빨리 여는 shortcut 은 없는가?
요약 : 가장 간편한 방법은 option 키 누르고 볼륨조절 또는 brightness 조절하는 키 누르는 것
설명 :
option key + 볼륨조절하는 키 (F11, F12) 누르면 sound preference 뜸
option key + brightness 키 (F1, F2) 누르면 display preference 뜸
Preference 의 다른 항목들을 액세스하려면 여기서 command + up arrow 누르면 됨
마우스의 배터리가 나갔다거나 할때 유용한 팁
인용 :
If you are using a Mac, there are some shortcuts that can get you quickly to some of the panels in the System Preferences. To get to the Sound section in System Preferences, hold down the Alt key and press the button on your keyboard that is used to adjust the sound. The System Preferences will open and you'll be taken directly to the Sound panel. To get to the Display section in System Preferences, hold down the Alt key and press the button on your keyboard used to adjust the screen brightness. The System Preferences will open and you'll be taken directly to the Display panel. To get to the Keyboard & Mouse section in System Preferences, hold down the Alt key and press the button on your keyboard used to adjust the brightness of the keyboard back light (notebooks only). The System Preferences will open and you'll be taken directly to the Keyboard & Mouse panel.
레퍼런스 : Shortcut to system preferences on the Mac
Tuesday, December 28, 2010
Sunday, December 26, 2010
애플 고딕의 bold체
질문 : 애플 고딕에 굵은 폰트는 없는가?
답 : 없다.
부연 :
시스템 폰트가 마음에 안든다고 바꾸려는 시도는 하지 말것.
OS X는 시스템 폰트를 강제로 바꾸면 시스템이 굉장히 불안정해진다고 함.
레퍼런스 : http://mirror.enha.kr/wiki/%EC%95%A0%ED%94%8C%20%EA%B3%A0%EB%94%95
http://mirror.enha.kr/wiki/%EC%BB%B4%ED%93%A8%ED%84%B0%20%EA%B4%80%EB%A0%A8%20%EC%A0%95%EB%B3%B4
답 : 없다.
부연 :
시스템 폰트가 마음에 안든다고 바꾸려는 시도는 하지 말것.
OS X는 시스템 폰트를 강제로 바꾸면 시스템이 굉장히 불안정해진다고 함.
레퍼런스 : http://mirror.enha.kr/wiki/%EC%95%A0%ED%94%8C%20%EA%B3%A0%EB%94%95
http://mirror.enha.kr/wiki/%EC%BB%B4%ED%93%A8%ED%84%B0%20%EA%B4%80%EB%A0%A8%20%EC%A0%95%EB%B3%B4
Html에서 Cross out 효과 주는 법
질문 : 텍스트를 지운 효과를 주는 방법? 예를 들면 이런거
요약 : <s>, </s>, 또는 <strike>, </strike>를 쓰면 된다.
요약 : <s>, </s>, 또는 <strike>, </strike>를 쓰면 된다.
Saturday, December 25, 2010
Blogger에서 Post 디폴트 포맷 주는 법
질문 : Blogger에서 포스트의 기본 포맷 주는 법?
요약 : Settings > Formatting > Post Template 를 이용한다
설명 : 거기서 다음과 같이 하면 됨
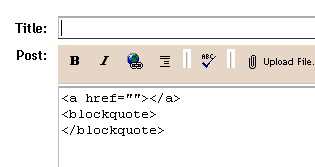
레퍼런스 : What is a post template?
요약 : Settings > Formatting > Post Template 를 이용한다
설명 : 거기서 다음과 같이 하면 됨
레퍼런스 : What is a post template?
Wednesday, December 22, 2010
윈도우와 맥 사이에서 Zip 파일의 한글 문제 해결
윈도우 - 맥 사이에 zip 교환시 한글 문제
1. 윈도우->맥 : 윈도우에서 압축한 zip 파일이 Mac OS X에서 한글 깨지는 현상 방지
2. 맥->윈도우 : Mac OS X에서 압축한 zip 파일이 윈도우에서 한글 깨지는 현상 방지
기타 압축 유틸리티 관련
Mac OS X에서 alz(알집파일) 푸는 법
Mac OS X 및 Windows7에 깔면 좋은 무료 압축 유틸리티 정리
설명
한글이나 일본어가 깨지는 근본 원인은 zip 포맷 자체가 유니코드를 사용하지 못하기 때문이다
1. 윈도우->맥 : 윈도우에서 압축한 zip 파일이 Mac OS X에서 한글 깨지는 현상 방지
2. 맥->윈도우 : Mac OS X에서 압축한 zip 파일이 윈도우에서 한글 깨지는 현상 방지
기타 압축 유틸리티 관련
Mac OS X에서 alz(알집파일) 푸는 법
Mac OS X 및 Windows7에 깔면 좋은 무료 압축 유틸리티 정리
설명
한글이나 일본어가 깨지는 근본 원인은 zip 포맷 자체가 유니코드를 사용하지 못하기 때문이다
Sunday, December 19, 2010
Friday, December 17, 2010
Mac OS X용 P2P
질문 : Mac OS X용 P2P 프로그램은?
답 : Transmission 으로 BitTorrent 를 쓸 수 있다. eMule을 쓰고 싶으면 aMule을 쓰면 된다.
부연 : http://bitsnoop.com/ 등의 Torrent 파일 검색 사이트가 있다.
답 : Transmission 으로 BitTorrent 를 쓸 수 있다. eMule을 쓰고 싶으면 aMule을 쓰면 된다.
부연 : http://bitsnoop.com/ 등의 Torrent 파일 검색 사이트가 있다.
윈도우에서 압축한 zip 파일이 Mac OS X에서 한글 깨지는 현상 방지
질문 : 윈도우에서 압축한 zip 파일이 Mac OS X에서는 한글이 다 깨져 나오는데 어떻게 하면 되나?
답 : The Unarchiver 로 풀면 된다.
설명 : 윈도우에서 압축한 zip 파일을 맥에서 그냥 풀면 인코딩 차이로 한글이 깨지지만 The Unarchiver 는 깨지지 않게 풀어준다. The Unarchiver 는 맥에서 필수적인 유틸리티.
참고 : 애초에 윈도우에서 7zip 파일(.7z)로 압축하는 것도 좋은 방법이다.
참고 링크 : Mac OS X에서 압축한 zip 파일이 윈도우에서 한글 깨지는 현상 방지
레퍼런스 : http://www.likejazz.com/macosx
답 : The Unarchiver 로 풀면 된다.
설명 : 윈도우에서 압축한 zip 파일을 맥에서 그냥 풀면 인코딩 차이로 한글이 깨지지만 The Unarchiver 는 깨지지 않게 풀어준다. The Unarchiver 는 맥에서 필수적인 유틸리티.
참고 : 애초에 윈도우에서 7zip 파일(.7z)로 압축하는 것도 좋은 방법이다.
참고 링크 : Mac OS X에서 압축한 zip 파일이 윈도우에서 한글 깨지는 현상 방지
레퍼런스 : http://www.likejazz.com/macosx
Thursday, December 16, 2010
윈도우7 에서 고용량 파일 여러 볼륨의 아카이브로 저장한것 맥으로 가져오기
1. 윈도우7 에서 7-zip 을 써서 여러 볼륨으로 나뉜 tar 파일로 저장하기
(1) 윈도우7 에서 압축할 파일 또는 폴더에 오른클릭 하고 > 7-zip > Add to Archive 한 후
(2) 옵션은 다음과 같이 함
Archive format : tar
Compression Level : Store
Split to volumes. bytes : 700M (CD)
2. 그러면 다음과 같은 파일이 생성됨
myFile.tar.001
myFile.tar.002
myFile.tar.003
이들을 DVD 등에 구우면 됨
3. Mac OS X 로 가져온 후 해제하려면
1. myFile.tar.001 에 오른클릭하고 The Unarchiver 로 해제
2. 그러면 001, 002, 003.. 으로 나눠졌던 파일이 myFile.tar 하나로 합쳐짐
3. 합쳐진 파일(myFile.tar)은 기본 압축툴인 ArchiveUtility 로 풀면 됨
-> 왜인지 이것은 The Unarchiver 로 잘 안풀림. 기본 압축툴로 풀면 당연히 한글은 제대로 안나오는데 해결법은 나중에 정리하기로.
Mac OS X 및 Windows7에 깔면 좋은 무료 압축 유틸리티 정리
Mac OS X
Stuffit Expander : 가장 많이 쓰이나 여러 볼륨으로 나눠 저장된 tar 등은 못푸는 단점
The Unarchiver : 여러 볼륨으로 나눠 저장된 tar 를 하나의 tar 로 만들어줄수 있음. 윈도우에서 압축한 zip을 한글이 안깨지게 풀 수 있음
GUI Unalz : 맥에서 알집 파일 해제용 유틸
Windows 7
7-zip : tar 포맷으로 대용량 파일 아카이브로 만들어 나눠서 저장하기 좋음
알집 : egg, alz 등 자사 유틸에서만 쓰이는 비표준 포맷 사용하는 단점 있으나 zip, rar 등이 무료로 제공됨
WinRAR : 압축률도 zip보다 좋고 rar 해제 속도도 알집보다 훨씬 빠르지만 유료임
윈도우7 에서 고용량 파일 여러 볼륨의 아카이브로 저장한것 맥으로 가져오기
링크 : http://pc-to-mac-changer.blogspot.com/2010/12/7.html
맥용 압축 유틸리티 인기순위
More popular File Compression downloads
1. StuffIt Expander
2. MacZip
3. StuffIt
4. The Unarchiver ... 다국어 지원 면에서 볼 때 국내에서 쓸때는 이게 BEST
5. MacRAR
순위는 다음 사이트 기준.
출처 : http://download.cnet.com/MacRAR/3000-2250_4-75029684.html?tag=mncol;pop
키워드 : Mac OS X
1. StuffIt Expander
2. MacZip
3. StuffIt
4. The Unarchiver ... 다국어 지원 면에서 볼 때 국내에서 쓸때는 이게 BEST
5. MacRAR
순위는 다음 사이트 기준.
출처 : http://download.cnet.com/MacRAR/3000-2250_4-75029684.html?tag=mncol;pop
키워드 : Mac OS X
Saturday, December 4, 2010
자막파일의 싱크를 맞춰주는 Mac OS X용 유틸리티
질문 : srt 등 자막파일의 싱크를 맞춰주는 Mac OS X용 유틸리티는?
요약 : Jubler 를 쓰면 된다.
링크 : http://www.jubler.org/
다른링크 : http://www.pure-mac.com/video.html#jubler
subtitle관련링크 : http://hintsforums.macworld.com/archive/index.php/t-54474.html
사용법 :
1. srt 를 load. (정확한 fps 를 입력할 필요까진 없음. 디폴트인 25로 해두면 됨)
2. 메뉴 > Tools > Shift Time 하고
3. Select Subtitles to Work On 항목에서 By Region 해서
4. Begin 을 Set Time To Minimum 하고 (톱니바퀴모양 버튼 이용)
5. End 를 Set Time To Maximum 하고 (톱니바퀴모양 버튼 이용)
6. Shift Subtitles 에서 shift 할 시간을 입력. + 또는 - 값을 줄 수 있음.
Save 할때 파일 포맷을 srt 로 지정해줌.
Windows7 에서 tar, gz, 7z 등의 압축파일 사용하는 법
질문 : Windows 에서 tar, gz, 7z 등의 포맷 쓰려면?
요약 : 7-zip을 쓰면 된다 (무료 소프트웨어)
다운로드 : http://www.7-zip.org/
주의점 : 64비트 버전의 윈도우 사용중이라면 다운로드시 64bit 버전을 받아야 한다.
32비트 버전을 쓰면 컴퓨터가 다운됨.
참고 : 고용량의 파일을 잘게 나누어 DVD 등에 저장할 때는 tar 포맷을 쓰는 것이 좋다. 압축이 되지 않고 archive 만 되므로 시간이 적게 걸리기 때문.
요약 : 7-zip을 쓰면 된다 (무료 소프트웨어)
다운로드 : http://www.7-zip.org/
주의점 : 64비트 버전의 윈도우 사용중이라면 다운로드시 64bit 버전을 받아야 한다.
32비트 버전을 쓰면 컴퓨터가 다운됨.
참고 : 고용량의 파일을 잘게 나누어 DVD 등에 저장할 때는 tar 포맷을 쓰는 것이 좋다. 압축이 되지 않고 archive 만 되므로 시간이 적게 걸리기 때문.
Mac OS X에서 압축한 zip 파일이 윈도우에서 한글 깨지는 현상 방지
질문 : Mac OS X에서 압축한 zip 파일이 윈도우에서 한글 깨지는 현상 방지하는 법?
요약 : CleanArchiver 를 쓰면 된다
설명 : CleanArchiver - 윈도우에서 깨지지 않도록 맥에서 압축하기 -> 여기에 잘 설명돼있음
다운로드 : 윈도우나 리눅스에서 한글 파일이름이 깨지지 않게 맥으로 압축하기 2 - CleanArchiver
참고 링크 : 윈도우에서 압축한 zip 파일이 Mac OS X에서 한글 깨지는 현상 방지
요약 : CleanArchiver 를 쓰면 된다
설명 : CleanArchiver - 윈도우에서 깨지지 않도록 맥에서 압축하기 -> 여기에 잘 설명돼있음
다운로드 : 윈도우나 리눅스에서 한글 파일이름이 깨지지 않게 맥으로 압축하기 2 - CleanArchiver
참고 링크 : 윈도우에서 압축한 zip 파일이 Mac OS X에서 한글 깨지는 현상 방지
Friday, December 3, 2010
Mac OS X에서 alz(알집파일) 푸는 법
질문 : 맥에서 알집으로 압축해놓은거(alz) 풀 수 있는 어플리케이션이 있나요?
요약 : GUI Unalz 를 쓰면 된다
설명 : 이것은 본래 Unalz 라는 콘솔 프로그램에 GUI를 입힌 것이라고 한다
부연 : 확장자만 zip이나 tar, gz 으로 바꾸면 StuffIt에서 풀리는 경우도
있다고 한다. 그러나 일반적으로는 되지 않는다. 또한 경우에 따라 GUI Unalz로
안풀리는 alz 파일도 있다. 어떠면 alz포맷이 버전업되고 있기 때문일지도 모르지만 확실친않다
링크 : http://brown.ezphp.net/25
요약 : GUI Unalz 를 쓰면 된다
설명 : 이것은 본래 Unalz 라는 콘솔 프로그램에 GUI를 입힌 것이라고 한다
부연 : 확장자만 zip이나 tar, gz 으로 바꾸면 StuffIt에서 풀리는 경우도
있다고 한다. 그러나 일반적으로는 되지 않는다. 또한 경우에 따라 GUI Unalz로
안풀리는 alz 파일도 있다. 어떠면 alz포맷이 버전업되고 있기 때문일지도 모르지만 확실친않다
링크 : http://brown.ezphp.net/25
Wednesday, December 1, 2010
맥에서 chm 파일 열기
iChm (a chm file reader for Mac OSX),
Chmox (a Mac OS X CHM viewer) 등을 쓰면 됨
검색어 : google > chm os x
키워드 : file format, mac, PC, help
Chmox (a Mac OS X CHM viewer) 등을 쓰면 됨
검색어 : google > chm os x
키워드 : file format, mac, PC, help
Monday, November 29, 2010
Space -> #222B
질문 : 맥에서 구운 DVD를 PC에서 보니 #222B라는 문자가 생성돼있는데 이건 무엇인가?
답 : Mac에서는 space가 파일명 처음이나 끝에 올 수 있는데
이러한 파일을 DVD로 구운 것을 PC로 옮긴걸 보면
스페이스 문자가 #222B 로 나타남을 볼 수 있다.
답 : Mac에서는 space가 파일명 처음이나 끝에 올 수 있는데
이러한 파일을 DVD로 구운 것을 PC로 옮긴걸 보면
스페이스 문자가 #222B 로 나타남을 볼 수 있다.
Monday, November 22, 2010
TextWranger 에서 font의 default size를 세팅해주는 법
Preference에서 (command + ,)
Editor Defaults 에 가면
Default font : 라고 써진 항목이 있다.
거기서 바꿔주면 된다.
Editor Defaults 에 가면
Default font : 라고 써진 항목이 있다.
거기서 바꿔주면 된다.
TextWrangler 에서 Command + T 누르면 나오는 사이즈 목록에 크기 추가하는 법
질문 : TextWrangler 에서 Command + T 누르면 나오는 사이즈 목록에 크기 추가하는 법?
예를 들면 16은 자주 쓰기 좋은 사이즈인데 기본 목록에 없다
답 : Command + T 누르면 뜨는 Fonts 창의 preference 버튼(기어 모양) 누르면
Edit Sizes 라고 뜨는데 거기서 New Size 에 16을 추가하면 된다
예를 들면 16은 자주 쓰기 좋은 사이즈인데 기본 목록에 없다
답 : Command + T 누르면 뜨는 Fonts 창의 preference 버튼(기어 모양) 누르면
Edit Sizes 라고 뜨는데 거기서 New Size 에 16을 추가하면 된다
Saturday, November 20, 2010
AppleScript 오랜만에 짤때 실수하기 쉬운 것 : set 과 = 혼동
set a to b + c
로 써야 하는 것을
a = b + c
같이 쓰는 실수를 하기 쉬운데 후자의 것은 비교문으로, 에러 메시지도 뜨지 않아 알기 힘들다
로 써야 하는 것을
a = b + c
같이 쓰는 실수를 하기 쉬운데 후자의 것은 비교문으로, 에러 메시지도 뜨지 않아 알기 힘들다
AppleScript의 loop에서 continue 하는 법?
질문 : AppleScript의 loop에서 continue 하려면? (C 처럼)
답 : 할수 없다. continue에 정확히 매치되는 명령은 없다.
레퍼런스 : Applescript equivalent of “continue”?
답 : 할수 없다. continue에 정확히 매치되는 명령은 없다.
레퍼런스 : Applescript equivalent of “continue”?
Monday, November 15, 2010
Text Editor 에서 맨 위/아래로 가는 단축키
TextEdit, TextWrangler 에서
맨 위/아래로 가는 단축키 : Command + 화살표 위아래
Text Wrangler 에서
페이지단위로 위아래로 가는 단축키 : Option + 화살표 위아래
맨 위/아래로 가는 단축키 : Command + 화살표 위아래
Text Wrangler 에서
페이지단위로 위아래로 가는 단축키 : Option + 화살표 위아래
Thursday, November 11, 2010
Wednesday, November 10, 2010
Start lists in TextEdit via the keyboard Apps
텍스트에디트 에서 리스트 만드는 법
리스트로 만들 텍스트 선택하고, Option + Tab 하면 된다.
오른클릭하고 List... 선택하면 - 외의 다른 header 를 선택할수 있다
이미 리스트로 만들어진 것은 선택 후 Tab 또는 Shift + Tab 해서 indent level 을 조절가능
Start lists in TextEdit via the keyboard Apps
리스트로 만들 텍스트 선택하고, Option + Tab 하면 된다.
오른클릭하고 List... 선택하면 - 외의 다른 header 를 선택할수 있다
이미 리스트로 만들어진 것은 선택 후 Tab 또는 Shift + Tab 해서 indent level 을 조절가능
Start lists in TextEdit via the keyboard Apps
enclosing folder 를 여는 법
Dock 위의 파일을 열지 않고 enclosing folder 를 여는 법
Command + Click 하면 됨
(Spotlight 검색결과에서도 마찬가지)
Command + Click 하면 됨
(Spotlight 검색결과에서도 마찬가지)
Tuesday, November 9, 2010
Preview 에서 전부 다 저장하는 핫키
Preview 에서 여러 파일 전부 다 저장하는 핫키
(일괄적으로 사이즈 조절 후 저장한다던가 할때 좋음)
Option + Command + s
(일괄적으로 사이즈 조절 후 저장한다던가 할때 좋음)
Option + Command + s
Monday, November 8, 2010
맥용 바이러스 백신
요약 : 가장 쓰기 쉬운 것으로 iAntivirus 가 있음
관련링크 :
Mac Antivirus Software Reviews: The Best and Worst of Mac Antivirus Software
Macintosh Viruses and Mac Virus Resources
키워드 : virus protection
관련링크 :
Mac Antivirus Software Reviews: The Best and Worst of Mac Antivirus Software
Macintosh Viruses and Mac Virus Resources
키워드 : virus protection
Wednesday, November 3, 2010
Mac OS X 에서 app을 자동으로 시작하게 하기
Automatically Start Apps at Login
질문 : 맥을 켜면 자동으로 어플리케이션이 실행되도록 하려면?
답 : dock 에서 app 에 오른클릭하고 "Open at Login"의 체크를 켜면 된다
출처 : http://www.tech-recipes.com/rx/2158/os_x_login_automatically_start_apps/
Just run the app, then click and hold the app’s icon in the dock, and select Open at Login.
질문 : 맥을 켜면 자동으로 어플리케이션이 실행되도록 하려면?
답 : dock 에서 app 에 오른클릭하고 "Open at Login"의 체크를 켜면 된다
출처 : http://www.tech-recipes.com/rx/2158/os_x_login_automatically_start_apps/
Just run the app, then click and hold the app’s icon in the dock, and select Open at Login.
Monday, November 1, 2010
매킨토시 미국 PC시장 3위 등극
애플 美 PC시장 3위 2010/10/14 16:36
(기사중에서)이로써 맥은 1890만대 판매를 기록한 미국 PC시장에서 10.6%의 시장 점유율을 차지하게 됐다. 1위와 2위는 여전히 휴렛팩커드(HP)와 델이 차지했다.
애플 맥의 매출 급증이 과연 아이팟 때문일까?
(본문중에서) 컴퓨터 이용시간의 대부분을 차지하는 웹에서 운영체계가 무엇인가는 전혀 문제가 되지 않는다. 첨단의 마케팅, 세련된 디자인 및 인텔 칩으로의 전환 결정이라는 요소들이 한데 어우러짐으로써 오늘과 같은 실적 증가가 있었다고 보는 것이 보다 타당한 설명일 것이다.
원문 : More to Mac sales than a halo
Sunday, October 31, 2010
Magic Mouse 의 known issues
매직마우스의 알려진 문제점들
1. middle click 이 안됨
2. 맥프로와 사용하는데 연결이 잘 유지가 안된다고 함
The Magic Mouse also has known issues with maintaining a stable connection to Mac Pro workstations.
출처 : http://en.wikipedia.org/wiki/Magic_Mouse
1. middle click 이 안됨
2. 맥프로와 사용하는데 연결이 잘 유지가 안된다고 함
The Magic Mouse also has known issues with maintaining a stable connection to Mac Pro workstations.
출처 : http://en.wikipedia.org/wiki/Magic_Mouse
mac 에서 쓰기 좋은 메신저
요약 : msn 메신저가 좋음
설명 :
네이트온도 가능하나 메시지가 잘 안가고
파일 전송이 잘 안되는 문제가 있다.
(버그가 고쳐지지도 않고 있음)
msn은 맥에서 아무 문제 없이 동작한다.
http://www.microsoft.com/mac/messenger
네이트온 이모티콘 가져오는 법
이모티콘 - 네이트온에 있는 메신져 이모티콘을 msn이모티콘에 추가하고 싶은데요
msn 메뉴에 보시면 '사용자 이모티콘 지정'이란 메뉴가 있죠? 거길 들어가셔서 추가하기를 누르시고 그림파일 찾아보기를 누르신 후에 네이트온이 설치된 폴더의 Emoticons폴더(C:Program FilesNATEON20Emoticons) 에 들어가시면 네이트온에서 사용하는 기본 이모티콘 파일이 모두 나열되어 있습니다. 여기에서 사용하고자 하시는 파일을 선택하시고(예: 02_방긋.bmp) 단축글에 '/방긋/' 이런 식으로 적절하게 입력하세요.
Friday, October 22, 2010
새로운 맥북 에어 MacBook Air
하드디스크가 아닌 플래시메모리만 사용함
http://www.apple.com/macbookair/
http://www.apple.com/macbookair/design.html
플래시메모리는 128G 와 256G 두가지가 있음
http://www.apple.com/why-mac/compare/notebooks.html
http://www.apple.com/macbookair/
http://www.apple.com/macbookair/design.html
플래시메모리는 128G 와 256G 두가지가 있음
http://www.apple.com/why-mac/compare/notebooks.html
Wednesday, August 25, 2010
MS Office for Mac 에서 Zoom in / out 하는 shortcut
질문 :
MS Office : Mac 에서 줌아웃/인 하는 핫키는?
답 :
simple, built-in shortcut to do this:
hold ctrl + cmd, scroll up or down.
출처 : http://www.thestudentroom.co.uk/showthread.php?t=710007
키워드 : hotkey
MS Office : Mac 에서 줌아웃/인 하는 핫키는?
답 :
simple, built-in shortcut to do this:
hold ctrl + cmd, scroll up or down.
출처 : http://www.thestudentroom.co.uk/showthread.php?t=710007
키워드 : hotkey
Wednesday, August 18, 2010
애플 코덱 Apple Codec - 동영상 편집 및 후처리에 강점
1. Apple Intermediate Codec(AIC) 또는 Pixlet 코덱 등
윈도우에 없는 빠른 동영상 코덱이 맥에서만 사용 가능하다.
2. 실제 사용해본 결과 압축대비 퀄리티가 윈도우에서 사용해온 코덱들과 비교가 안됨.
3. Cross platform 이지만 아직까지 Final Cut Studio, iMovie 등에서만 지원되므로,
4. 결론을 내리자면 영상 편집용으로는 맥을 쓰는게 좋음
윈도우에 없는 빠른 동영상 코덱이 맥에서만 사용 가능하다.
2. 실제 사용해본 결과 압축대비 퀄리티가 윈도우에서 사용해온 코덱들과 비교가 안됨.
3. Cross platform 이지만 아직까지 Final Cut Studio, iMovie 등에서만 지원되므로,
4. 결론을 내리자면 영상 편집용으로는 맥을 쓰는게 좋음
Wednesday, August 11, 2010
Full screen Quick Look keyboard shortcut
질문 : Space bar 스페이스바 누르면 뜨는 Quick Look을 Full screen 로 보려면 Hot key 는?
답 : Option + Space 또는 Command + Option + Y
출처 : Full screen Quick Look keyboard shortcut
키워드 : hotkey, 핫키
답 : Option + Space 또는 Command + Option + Y
출처 : Full screen Quick Look keyboard shortcut
키워드 : hotkey, 핫키
Wednesday, August 4, 2010
2010년 8월에 출시되는 12 Core 신형 맥프로
2010년 8월에 출시되는 12 Core 신형 맥프로 정보
출처 : http://www.apple.com/kr/macpro/features/processor.html
가속화된 아키텍처
코어를 선택하세요: 4, 6, 8, 혹은 12 코어
새로운 Mac Pro에는 우수한 Intel 프로세서 선택 사양 두 가지가 제공됩니다. 쿼드 코어인 Intel Xeon 'Nehalem' 프로세서는 단일 프로세서로, 쿼드 코어로 구성시 속도를 최대 3.2GHz까지 높일 수 있습니다. 더 빠르고 강력한 성능이 필요한 경우에는 Intel의 차세대 프로세서이며 최신 32나노미터 공정 기술로 만들어진 'Westmere' 시리즈를 선택하십시오. 'Westmere'는 쿼드 코어 혹은 6 코어 버전으로 구성할 수 있어 Mac Pro에 하나 또는 두 개의 프로세서가 탑재됩니다. 다시 말해, Mac Pro를 6 코어 3.33GHz나 8 코어 2.4GHz로 구성할 수 있으며, 최고의 성능을 원한다면 12코어 2.93GHz로도 구성할 수 있습니다.
단일 칩의 장점
대다수의 멀티코어 프로세서는 분리된 칩 2개로 구성되어 있어 캐시 데이터가 다른 코어로 전달되려면 프로세서 밖으로 나가야 하므로 정보 접근성이 비효율적입니다. 그러나 쿼드 코어와 6 코어 Intel Xeon 프로세서는 단일 칩, 64비트 아키텍처에 각 프로세서마다 코어 전체가 8MB 또는 12MB L3 캐시를 공유하고, 그 결과 캐시 데이터에 빠르게 접근할 수 있어 응용 프로그램의 성능도 더 향상됩니다. 또한 다른 진보된 기술도 함께 적용되어 새로운 Mac Pro는 이전 세대에 비해 최대 1.5배 빨라졌습니다.
고속 고용량 메모리
시스템 메모리는 별도의 입출력 제어장치를 통해 연결되는 경우가 자주 있습니다. 그러나 'Nehalem' 및 'Westmere' 프로세서는 통합 메모리 컨트롤러를 갖추고 있어 메모리에 바로 연결됩니다. 따라서 메모리에 저장된 데이터에 더 빠르게 접근할 수 있으므로 메모리 호출 시간도 감소하였습니다.
통합 메모리 컨트롤러와 빠른 1066MHz 또는 1333MHz DDR3 ECC SDRAM 을 탑재한 Mac Pro는 이전 세대에 비해 메모리 대역폭이 더 넓어졌습니다. 대역폭이 넓을수록 더 많은 데이터가 프로세서에 더 빨리 전달되며, 각 코어는 정보 도착을 기다릴 시간에 더 많은 데이터를 처리할 수 있습니다. 그리고 ECC(Error Correction Code)는 싱글비트 오류를 정정하고 멀티비트 오류를 자동으로 감지합니다. 이런 특징은 필수 작업과 연산 처리가 집중적으로 이루어지는 환경에서 특히 중요합니다.
언제나 (그리고 어디에나) 사용할 수 있는 파워
Mac Pro는 작업량에 따라 프로세서의 클럭 속도를 자동으로 높이는 다이내믹 성능 기술인 Turbo Boost가 적용되어 있습니다. 모든 코어를 활용하지 않아도 되는 응용 프로그램을 실행하고 있다면, Turbo Boost는 사용 중인 코어의 속도를 향상시킵니다. 12 코어 Mac Pro에서는 최대 3.33GHz, 6 코어 Mac Pro에서는 최대 3.6GHz까지 올립니다.
최대 24 가상 코어
Intel Xeon 프로세서는 하나의 코어에서 두 스레드가 동시에 실행되는 하이퍼스레딩을 지원하므로 12 코어 Mac Pro에서 Mac OS X은 24 가상 코어를 인식합니다. 하이퍼스레딩은 프로세서가 활용할 수 있는 코어에서 리소스가 최대한 실행되게 하므로 Mac Pro의 성능도 향상됩니다.
최소한의 경로 저항
Intel Xeon 프로세서에는 QuickPath Interconnect라고 불리는 양방향성 Point-to-Point 연결이 적용되어 디스크, 입출력 장치, 기타 Mac Pro 하위시스템에 더 빠르게 접근할 수 있습니다. 듀얼 코어 Mac Pro 모델에는 2개의 프로세서 사이에도 QuickPath Interconnect가 적용되었습니다. 이는 파이프라인으로 바로 연결된 것과 마찬가지여서 프로세서에서 프로세서로 전달되는 데이터가 입출력 허브를 통해 멀리 돌아가지 않아도 됩니다. Mac Pro의 성능이 전체적으로 향상된 또 다른 비결입니다.
강력한 전력 효율
Mac Pro는 EPA의 엄격한 저전력 요구 조건을 충족하여 ENERGY STAR 인증을 취득하였습니다. ENERGY STAR 5.0은 전원 공급에 대해 매우 높은 효율성을 요구하며 컴퓨터의 일반 연간 전력 소비량도 엄격하게 제한하고 있습니다.
CamStudio - 무료 스크린 동영상 캡처 프로그램
CamStudio
화면을 동영상 캡쳐해주는 무료 프로그램.
간결하고 꼭 필요한 기능만 있어서 좋음.
(맥용은 없고 윈도우 용만 있음)
Camtasia(캠타시아)같은 유료 소프트웨어보다 나은것 같음.
다운로드 :
camstudio 홈페이지에서 다운로드 - http://camstudio.org/
주의점 :
다만 Option > Video Options 에서
Quality 를 디폴트 70으로 하면 화질이 안좋으므로 100 으로 올려줄것
키워드 : Screen, Capture
화면을 동영상 캡쳐해주는 무료 프로그램.
간결하고 꼭 필요한 기능만 있어서 좋음.
(맥용은 없고 윈도우 용만 있음)
Camtasia(캠타시아)같은 유료 소프트웨어보다 나은것 같음.
다운로드 :
camstudio 홈페이지에서 다운로드 - http://camstudio.org/
주의점 :
다만 Option > Video Options 에서
Quality 를 디폴트 70으로 하면 화질이 안좋으므로 100 으로 올려줄것
키워드 : Screen, Capture
Tuesday, August 3, 2010
Intel CPU 한눈에 보기 (Part 1)
Intel CPU 감잡기
레퍼런스 :
Intel CPU 한눈에 보기 (Reference)
Intel CPU 한눈에 보기 (draft)
http://ascii.jp/elem/000/000/419/419412/
http://en.wikipedia.org/wiki/X86#Chronology
인텔 CPU에 사용된 마이크로아키텍처(Microarchitecture)는 80286, 80386, 80486 이후로 더이상 숫자가 사용되지 않고 Pentium, Core 등의 브랜드 네임으로 불려왔다. 따라서 과거에는 컴퓨터를 잘 모르는 사람들도 486이 386보다 신모델임을 쉽게 알수 있었지만 요즘은 그렇지 못하다.지금은 986 시대
80386 부터는 Intel 을 뜻하는 i 를 앞에 붙여서 i386, i486 과 같은 이름을 쓰기도 했다. 다만 i586이 될뻔 했던 CPU 부터는 펜티엄이라는 고유명사가 사용되기 시작하였고 그때부터 일반 소비자들은 컴퓨터 구매시 많은 혼란을 겪었다. 이런 문제 때문에 요즈음의 코어 i 시리즈에서는 과거와 같은 숫자 방식으로 되돌아가고 있다.
인텔 CPU의 종류에 감을 잡으려면 숫자로 기억하는게 편하다. Pentium Pro, Pentium 4, Core2, i7 등으로 기억하는 것보다 각각을 686, 786, 886, 986 으로 기억하면 편할 것이다 (공식 명칭은 아니지만...). 실제로 80686, 80786 은 인텔에서도 내부적으로 공공연히 사용되었던 명칭이다. 64비트 CPU부터는 886, 986 이라는 명칭이 사용되지 않게 되었지만 이 글에서는 기억하기 쉬운 별칭으로서 사용하기로 한다.
이 글을 쓰는 시점(2010년 8월)에서는 Nehalem 프로세서인 i7이 가장 high-end CPU 로 팔리고 있는 시점인데 공교롭게도 Nehalem 프로세서에 80x86 식의 이름을 짓는다면 마지막 숫자인 9 가 사용된 80986 이 되었을 것이다.숫자의 의미는... 마이크로아키텍처의 Generation
과거 80286 하면 하나의 프로세서만을 의미했다. 그러나 이는 시간이 지나면서(특히 Pentium 이후로 오면서) "공통된 설계 구조를 가진 여러 종류의 CPU들 묶는 제품군"의 의미로 쓰이기 시작했다.
예를 들어 i686(공식명칭은 P6)은 Pentium Pro 에서 Pentium III 까지의 제품군에 사용된 기본 구조를 의미한다. 즉 i686은 "마이크로아키텍처"즉 "설계구조"이지 하나의 CPU 만을 의미하는 것은 아닌 것이다.1. 16비트 CPU
그러면 인텔 CPU 의 역사를 순서대로 요약해보자. 上記한대로 Nehalem 는 80986(i986) 과 같이 써본다.
8086, 80286 으로 이어진 것이 인텔의 16비트 CPU 들이다.2. 32비트 CPU 초반기
1988년 경에 PC를 산다면 보통 286 이었을 것이다.
이때는 다 DOS 만 썼다. GUI 는 맥에서만 동작했다.
80386 에서 시작하여 80486 으로 이어진 것이 초기의 32비트 CPU 들이었다.3. 32비트 CPU 후반기
1992년 경에 좀 좋은 PC를 산다면 보통 486 DX 였을 것이다.
(당시는 보통 스펙으로는 386이 쓰이면서 486이 하이엔드였던 시절)
32비트 CPU 초반기는 윈도우가 나왔음에도 불구하고 MS-DOS 가 여전히 많이 쓰이던 시기이다. 즉 OS 면에서 보면 과도기적인 시기라고 볼 수 있다. 마이크로소프트 윈도우가 대중적으로 사용되기 시작한 것이 이 무렵으로, 윈도우 3.1이 처음 나온 것이 1992 년이었지만 이는 어디까지나 도스 위에서 동작하는 것에 불과했다.
펜티엄이 세상에 나온게 93년이고 한국에서는 94년부터 판매되기 시작했지만 486은 95년경까지 "장기집권" 했다고 한다. 10년 전(1996년) 486 DX-66으로 짱먹었던 그시절 그 PC 라는 글 참고.
32비트 CPU 후반기는 인텔이 AMD에게 밀려 고전하던 시기이다. 한편 윈도우95, 윈도우 2000, 윈도우 XP 가 사용되어, 마이크로소프트 윈도우가 시장을 완전히 장악한 시기이기도 하다. 이 무렵 애플은 퍼스컴 시장에서 완전히 밀려나 버렸다.
80586 = i586 = P5 (microarchitecture) (1993) ... 여기서 설명하는 통칭 P5코어는 Pentium 에 구현된 구조이다. (펜티엄은 한차례 floating point 에러로 홍역을 앓고 국내에서는 판매 부진을 겪은바 있다). 펜티엄은 초반에는 조립용으로 잘 안팔렸으나 MMX 유닛 등이 추가된 'P55 코어(이때부터 명칭은 Pentium MMX 가 됨)'가 나오면서부터 많이 사용되기 시작했다. MMX 라는 것은 멀티미디어에서 잘 쓰이는 floating point 처리 등을 병렬처리할 수 있게 한 것으로, 게임을 빠르게 돌아가게 만든 것이라고 보면 이해하기 쉽다.
80686 = i686 = P6 (microarchitecture) (1995년) ... P6 코어는 내부가 RISC 프로세서화 되는 등 P5 와 설계가 완전히 바뀐 구조이다. P6 는 Pentium Pro 에 구현된 후로 Pentium II, Pentium III 까지 사용되었다.
Pentium Pro 는 일반 소비자용은 아니고 워크스테이션이나 서버용이었기 때문에 대중화되지는 않았으나 Xeon 시리즈의 선조라는 점에서 큰 의미가 있다.
Pentium II 는 Pentium Pro 의 약점이었던 16비트 코드 처리 속도를 높였다. (Intel notably improved 16-bit code execution performance on the Pentium II, an area in which the Pentium Pro was at a notable handicap) 당시는 32비트 시대였지만 대부분의 소프트웨어는 16비트 코드를 어느 정도 사용하고 있었기 때문에 이는 그 시기로서는 중요했다. Pentium II 는 L2 cache 가 프로세서와 분리되어 생산비용은 절감되었지만 속도가 느려졌다. 이는 Pentium II 가 펜티엄 프로의 저가형 버전 (consumer-oriented version of the Pentium Pro) 이었기 때문이다. 대신 L1 캐시가 커지고 16비트 연산이 빨라져서 전체적으로는 빨라지면서도 가격은 내렸다.
Pentium III 는 Pentium II 에 비해 floating point 연산과 병렬처리(parallel calculations)를 강화하기 위한 'SSE instruction set'가 추가된 것이 주된 변화였다. 과거 컴퓨터를 썼던 사람들은 어느 순간부터인가 MMX 라는 말이 사라졌던 것을 기억할지도 모르는데, 그것은 펜티엄 III 부터 SSE 가 MMX 를 대체했기 때문이다. MMX 라던가 SSE 같은 것은 쉽게 말하면 프로세서가 여러 데이터를 동시에 처리하는 구조 즉 SIMD (Single Instruction, Multiple Data) 으로, 과거에는 슈퍼컴퓨터에서나 쓰이던 구조이다.
P6 는 그 후 많이 개선되어 laptop(노트북)용인 Pentium M 까지 이어지는데 Pentium M 에 쓰인 P6 구조 즉 코드네임 Yonah 가 바로 Core 아키텍처의 효시이다. 그런 면에서 이 아키텍처는 매우 중요하다. The successor to the Pentium M variant of the P6 microarchitecture is the Core microarchitecture. Pentium M 의 가장 큰 변화는 power efficiency 향상이다 (노트북용이므로 배터리 수명을 늘리기 위해 이는 당연한 변화이다).
사실 이때까지만 해도 i686이라는 명칭은 비공식적으로 사용되곤 했다. 같은 해 Windows 95 가 나옴.
80786 = i786 = NetBurst (microarchitecture) (2000년) ... NetBurst 라는건 Pentium 4 에 구현된 아키텍처로, 소비전력과 발열량이 엄청난데다 성능에서도 AMD의 Athlon 64 계열에 뒤져서 시장에서 고전했다. 그 원인은 속도를 높이는 수단으로서 클락속도 높이는 것에 주력했기 때문인데 결과적으로 당시 인텔 CPU에 대한 소비자들의 불만도 엄청났고 많은 사람들이 AMD 로 돌아서게 되었다(소위 암드빠 라고 불리는 사람들은 대개 이 시기에 생겨난 부류이다.
따라서 이 구조는 인텔의 차기 CPU(코어, 코어2)에서 더이상 계승되지 않았다. 다만 Hyper-threading 등 몇몇 기술이 부분적으로 Core 에 채택되었다. (Nehalem reimplements the Hyper-threading Technology first introduced in the 3.06 GHz Northwood core of Pentium 4. Nehalem also implements an L3 cache in processors based on it.) 펜티엄 4에서는 다소 불완전했던 SSE 의 '완전체'라고 할 수 있는 SSE2 가 도입되어 호평을 받았다. 프로그래머들은 어떤 타입의 데이터도 MMX 나 FPU 를 사용하지 않고 완전히 SSE2 에서만 계산할 수 있게 되었다.4. 64비트 CPU
펜티엄 4 의 처음 코어는 Willamette 이라는 코드네임으로 나왔다.
그 다음 나온 것이 코드네임 Northwood 로 여기에는 하이퍼스레딩이 추가되었고
그 다음 나온 것이 코드네임 Prescott 으로 여기에는 SSE3 가 추가되었다.
노스우드, 프레스캇 등은 코드네임이지만 온라인 PC 상점에서도 많이 보았을 것이다.
NetBurst 에는 i786 또는 80786 이라는 명칭 역시 종종 사용되었으나 공식 이름은 아니다. 아무튼 7번째 generation 이라는 것은 위키피디아에서도 "The Pentium 4 microprocessor from Intel is a seventh-generation CPU targeted at the consumer market." 이라고 설명하고 있다.
한편 2000년에는 Windows 2000이 나와 빠른 시간에 상당히 널리 보급되었다.
2001년 Windows XP가 나왔는데 초기에는 XP가 무겁다는 이유로 인기가 없고 윈도우 2000에 안주하는 사람들이 많았음. 그러나 점차 XP가 널리 퍼져 2004~2005년 경에는 대다수의 사람들이 XP를 썼던 것 같다. (통계에 따르면 2007년에 76%의 압도적인 보급률로 피크를 기록했고 이 글을 쓰는 2010년 현재에도 54.6%의 market share를 가짐). 펜티엄 4 즉 i786 을 산 사람들 상당수는 윈도우 2000을 쓰다가 XP로 바꾼 경험이 있을 것이다.
오늘날 쓰이는 64비트 CPU 즉 코어2 이후의 것들은 Part 2 에서 더 자세히 정리할 것이므로이 글을 쓰는 시점에서 가장 고성능의 컴퓨터
여기서는 개략적으로만 정리해보자.
Pentium이 32비트 시대의 후반부를 장식하는 인텔 브랜드였다면
Intel Core 브랜드는 64비트로 넘어오면서 사용되기 시작하여 지금까지 이어져오고 있다.
Core 는 초반의 Core2 와 현재의 Nehalem(i3, i5, i7) 를 통칭하는 브랜드이다.
한편 64비트 시대로 넘어오면서 윈도우 XP가 이를 지원하지 못하여 윈도우 7의 시대로 넘어갔다. 32비트 시대와 64비트 시대의 과도기에 위치했던 윈도우 비스타는 32비트와 64비트 두가지 버전이 있었는데, 인기가 시들하여 빠르게 사라진 실패작이었다.
80886 = i886 = Core (microarchitecture) (2006년) ... 64비트가 처음 도입된 구조로, 64-bit Core microarchitecture 라고 부름. P6(Pentium M 에 적용되었던 i686)의 변형 구조가 계승된 것이 Core. Intel has replaced NetBurst with the Core microarchitecture, released in July 2006, which is more directly derived from 1995's Pentium Pro than it is from NetBurst.
80986 = i986 = Nehalem (microarchitecture) (2009) ... i986 즉 Nehalem은 i886 즉 Core2 와 같은 Core 브랜드를 사용하고 있으나 Core2 에 비해 진일보된 구조이다. The first processor released with the Nehalem architecture was the desktop Core i7,[3] which was released in November 2008. It was followed by several Xeon processors and by the i3 and i5.
2010년 8월에 출시되는 12 Core 신형 맥프로참고 : Core Processor 의 세부 브랜드 코드네임
블룸필드, 린필드, 클락데일, 걸프타운이 Nehalem 의 세부브랜드의 코드네임들이고참고 : x86
콘로, 켄츠필드, 울프데일, 요크필드 등이 Core2 의 세부브랜드의 코드네임들인데
이는 다음에 잘 나와 있다.
Intel CPU 한눈에 보기 (Part 1)
http://en.wikipedia.org/wiki/Intel_Core#Core_i7
As the term became common after the introduction of the 80386, it usually implies binary compatibility with the 32-bit instruction set of the 80386. This may sometimes be emphasized as x86-32 to distinguish it either from the original 16-bit "x86-16" or from the 64-bit x86-64.[5] Although most x86 processors used in new personal computers and servers have 64-bit capabilities, to avoid compatibility problems with older computers or systems, the term x86-64 (or x64) is often used to denote 64-bit software, with the term x86 implying only 32-bit.[6][7]참고 : Celeron
셀러론은 특정 마이크로아키텍처를 뜻하는 것이 아니라 단지 인텔 CPU의 저가형 모델을 마케팅하기 위한 상표이다. Pentium II 부터 시작해서 Pentium III, Pentium 4, Pentium M, Core 2 Duo 까지 Celeron 브랜드가 팔리고 있다.키워드 : 컴퓨터, PC, 조립, Computer
레퍼런스 :
Intel CPU 한눈에 보기 (Reference)
Intel CPU 한눈에 보기 (draft)
http://ascii.jp/elem/000/000/419/419412/
http://en.wikipedia.org/wiki/X86#Chronology
Saturday, July 24, 2010
Youtube, Vimeo 등 동영상 다운받는 법
질문: How to download video from vimeo.com?
답 : Youtube, Vimeo 등 동영상 다운받는 법 참조
답 : Youtube, Vimeo 등 동영상 다운받는 법 참조
Youtube, Vimeo 등 동영상 다운받는 법
다음을 사용한다.
Youtube : Free YouTube Downloader http://youtubedownloader.com/
Vimeo : vimeo에는 download 버튼이 있다. 또는 다음을 이용해도 가능. DownloadVimeo.com
(문서 업데이트 : 2015년 3월 28일)
Youtube : Free YouTube Downloader http://youtubedownloader.com/
Vimeo : vimeo에는 download 버튼이 있다. 또는 다음을 이용해도 가능. DownloadVimeo.com
(문서 업데이트 : 2015년 3월 28일)
Easily download YouTube movies via Safari Web Browsers
Easily download YouTube movies via Safari Web Browsers
Apr 23, '07 07:30:01AM • Contributed by: marco.trive
If you're using Safari, there's an easy way to download YouTube videos. Open the page with the movie and press Command-Option-A, which shows the Activity window. If you're also loading other sites, you'll see a list of them: scroll until you find the YouTube page and click on the arrow to show details about what is being loaded.
You will certainly notice an element whose size is over 0.5MB (most of the time, over 5MB). Double-click on it (even if it is still loading), and Safari will download it. When the download is over, navigate to the file in the Finder (which will probably be called get_video) and add the extension .flv to its name. Now you can play it with VLC or with QuickTime (only if you have Perian installed).
[robg adds: We've covered the use of the Activity window before, but with the popularity of YouTube, I felt it was worth pointing out this one specialized use.]
Sunday, July 4, 2010
Tuesday, June 22, 2010
맥용 바이러스 백신 관련 자료
맥용 바이러스 백신 관련 자료
http://antivirus.about.com/od/macintoshresource/tp/macvirusfaqs.htm
맥이 바이러스에 강한 이유 등
http://antivirus.about.com/od/macintoshresource/tp/macvirusfaqs.htm
맥이 바이러스에 강한 이유 등
Friday, June 18, 2010
Snow Leopard and Maya : not compatible
Snow Leopard and Maya (2009 or 2010)
graph editor 의 refresh 가 잘 안되는 문제 등으로 사용하기 힘듬
graph editor 의 refresh 가 잘 안되는 문제 등으로 사용하기 힘듬
Thursday, June 3, 2010
Quicktime Pro 에서 동영상 회전하기
질문 : 가로로 누운 채 플레이되는 영상을 회전하고 싶은데 어떻게 하나?
답 :
Window > Show Movie Properties (Command + J) 로 가서
Video Track 에 보면
Visual Settings 탭에
Filp / Rotate 라는 항목이 있는데 여기서 회전해주고
동영상을 다시 저장하면 된다.
레퍼런스 :
Rotating a video with QT Pro
답 :
Window > Show Movie Properties (Command + J) 로 가서
Video Track 에 보면
Visual Settings 탭에
Filp / Rotate 라는 항목이 있는데 여기서 회전해주고
동영상을 다시 저장하면 된다.
레퍼런스 :
Rotating a video with QT Pro
Tuesday, June 1, 2010
AppleScript의 repeat 문에서 break 에 해당하는 것은?
질문 : AppleScript의 repeat 문에서 break 에 해당하는 것은?
답 : exit repeat 하면 된다
답 : exit repeat 하면 된다
AppleScript에서 string reverse 하기
reverse of "ABCDEF"
-- Error
characters of "ABCDEF"
-- Returns: {"A", "B", "C", "D", "E", "F"}
reverse of characters of "ABCDEF"
-- Returns: {"F", "E", "D", "C", "B", "A"}
reverse of characters of "ABCDEF" as text
레퍼런스 :
http://applescripter.blogspot.com/2007/03/applescript-reverse-of-string.html
-> 그런데 함수 내에서 이렇게 해서 리턴해주면 모든 글자 사이에 space가 생겨버리는 문제가 있다.
다음과 같이 하면 잘된다. 더 간단한 코드가 있을진 모르지만 귀찮아서 이걸로 그냥 씀.
on myGetReverseText(str)
set A to characters of strend myGetReverseText
set result_ to "" as text
set n to (length of A)
repeat with i from 1 to n
set ch to (item (n - i + 1) of A)end repeat
set result_ to result_ & ch
return result_
Monday, May 31, 2010
Installing QuickTime Player 7 on Mac OS X v10.6 Snow Leopard
질문 :
Quicktime 7 Pro 를 구매했는데 OS 가 snow leopard 라 이미 Quicktime X 가 인스톨된 상태이다.
이 상태에서는 Quicktime Pro 가 요구하는 퀵타임 버전 7 를 깔수가 없다. 어떻게 해야 하나?
답 :
Installing QuickTime Player 7 on Mac OS X v10.6 Snow Leopard
Mac OS X v10.6 includes QuickTime X that includes a new QuickTime Player, a clean and uncluttered interface, easy media sharing, and flexible recording capabilities. A Mac OS X v10.6-compatible version of QuickTime Player 7 is also available.
Should you need it, a Mac OS X v10.6 Snow Leopard-compatible version of QuickTime Player 7 is also available for use with older media or with existing AppleScript-based workflows. QuickTime Player 7 can be used to playback formats such as QTVR, interactive QuickTime Movies, and MIDI files. Also, it supports QuickTime 7 Pro registration codes for access to QuickTime Pro functionality.
To install the QuickTime Player 7 from the Mac OS X v10.6 Snow Leopard install DVD:
1. Insert your Mac OS X 10.6 Snow Leopard Install DVD.
2. Open the Optional Installs folder and double-click "Optional Installs.mpkg".
3. Select the QuickTime 7 option and click Continue.
4. QuickTime Player 7 will be installed in your Utilities folder.
Note: If you double-click any media that requires QuickTime Player 7 for playback and it is not already installed, you will be asked if you want to download it from Apple.
Wednesday, May 26, 2010
대용량 하드 FAT32로 포맷하는 법
대용량 하드 FAT32로 포맷
(본문중에서)
- FAT32의 장점
■ 관대한 범용성을 가진다.
(Windows 98/ME/2000/XP에서 모두 사용가능합니다.
특히, 외장하드를 FAT32로 사용시에만 다른기기에서 인식이 됩니다.)
- NTFS의 장점
■ 일부 디스크관련 오류를 수정할수 있다.
■ 보안기능이 강화됐다.
■ 대용량 디스크 지원이 수월하다.
■ 디스크 조각모음을 하지 않아도 된다.
일반적으로는 NTFS형식으로 사용 중였는데, 외장하드를 다른 기기에 물리려니 FAT32형식으로 포맷이 되어야만 인식된다는 말에 새로 FAT32로 포맷을 하려고 했더니 문제가 생기네요.
회사서 쓰는 컴퓨터의 하드도 32G를 넘어서는 용량이라 NTFS로 해야만 모든 하드를 파티션 분할없이 사용할수 있습니다. 그래서 하드를 통채로 FAT32 로 포맷해주는 프로그램을 찾아봤더니 역시나 있군요.
- FAT32 변환 프로그램 : fat32fmt_setup.zip 또는 FAT32FMT (둘다 동일한 프로그램 다운로드)
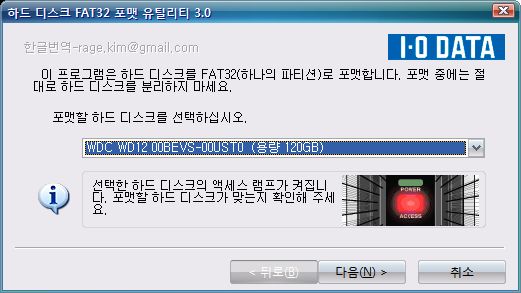
http://rageworx.tistory.com/324에 나오는 설명:
이 프로그램은 일본 IO-DATA 사에서 배포하는 포맷 유틸리티 입니다.
일본어로 되어 있어서 사용에 어려움이 많아서 리소스 및 실행 파일을 수정하여 한글화 하였습니다.
설치 파일이 필요 없이 압축 파일만 받아서 아무데나 푼 다음 실행하면 사용이 가능합니다.
(본문중에서)
- FAT32의 장점
■ 관대한 범용성을 가진다.
(Windows 98/ME/2000/XP에서 모두 사용가능합니다.
특히, 외장하드를 FAT32로 사용시에만 다른기기에서 인식이 됩니다.)
- NTFS의 장점
■ 일부 디스크관련 오류를 수정할수 있다.
■ 보안기능이 강화됐다.
■ 대용량 디스크 지원이 수월하다.
■ 디스크 조각모음을 하지 않아도 된다.
일반적으로는 NTFS형식으로 사용 중였는데, 외장하드를 다른 기기에 물리려니 FAT32형식으로 포맷이 되어야만 인식된다는 말에 새로 FAT32로 포맷을 하려고 했더니 문제가 생기네요.
회사서 쓰는 컴퓨터의 하드도 32G를 넘어서는 용량이라 NTFS로 해야만 모든 하드를 파티션 분할없이 사용할수 있습니다. 그래서 하드를 통채로 FAT32 로 포맷해주는 프로그램을 찾아봤더니 역시나 있군요.
- FAT32 변환 프로그램 : fat32fmt_setup.zip 또는 FAT32FMT (둘다 동일한 프로그램 다운로드)
http://rageworx.tistory.com/324에 나오는 설명:
이 프로그램은 일본 IO-DATA 사에서 배포하는 포맷 유틸리티 입니다.
일본어로 되어 있어서 사용에 어려움이 많아서 리소스 및 실행 파일을 수정하여 한글화 하였습니다.
설치 파일이 필요 없이 압축 파일만 받아서 아무데나 푼 다음 실행하면 사용이 가능합니다.
Friday, May 21, 2010
Apple Keyboard with Numeric Keypad
Numeric Keypad 가 없는 Apple Wireless keyboard 는 Maya 등 전문가용 소프트웨어를 사용하는 사용자에게는 상당히 불편하다. 그 외에도 page up, page down, home, end 등을 사용할 수 없을 경우 불편을 느끼는 사용자들도 많을 것이다. 그런 사람들은 Apple Keyboard with Numeric Keypad 를 사용하는 것이 좋다.
http://www.apple.com/keyboard/
Apple Keyboard with Numeric Keypad
http://www.apple.com/keyboard/
Apple Keyboard with Numeric Keypad
Wednesday, May 19, 2010
Maya를 Mac 에서 쓸때 Pivot 변경할때 insert 키 없을 경우 어떻게 하나
질문 : Maya를 Mac 에서 쓸때 Pivot 변경할때 insert 키 없을 경우 어떻게 하나
답 :
Insert 키 대신
Fn + Left 를 사용하면 됨.
(Home 버튼임)
근본적인 해결법으로는 numeric keypad 가 있는 키보드를 사용하는 것이 좋음.
http://pc-to-mac-changer.blogspot.com/2010/05/apple-keyboard-with-numeric-keypad.html
답 :
Insert 키 대신
Fn + Left 를 사용하면 됨.
(Home 버튼임)
근본적인 해결법으로는 numeric keypad 가 있는 키보드를 사용하는 것이 좋음.
http://pc-to-mac-changer.blogspot.com/2010/05/apple-keyboard-with-numeric-keypad.html
Tuesday, May 18, 2010
이름이 같은 폴더를 덮어쓸 때 윈도우와 맥의 차이점
예를 들어 내 하드의 myPic 이라는 폴더를 외장하드의 myPic 이라는 폴더로 덮어쓰기할때,
윈도우에서는 기존의 myPic 폴더 내의 파일들이 이름이 다른 한 보존되지만
맥에서는 외장하드의 myPic 폴더가 지워지고 새 myPic 폴더로 완전히 대체된다.
맥을 쓸 때 특히 주의해야 할 점이다.
키워드 : overwrite
윈도우에서는 기존의 myPic 폴더 내의 파일들이 이름이 다른 한 보존되지만
맥에서는 외장하드의 myPic 폴더가 지워지고 새 myPic 폴더로 완전히 대체된다.
맥을 쓸 때 특히 주의해야 할 점이다.
키워드 : overwrite
Friday, April 30, 2010
맥에서 일본어 입력하는 법
여기 잘 나와 있다 :
かな文字の入力
윈도우와 거의 같으나
작은 문자를 쓸 때 l 대신 x 를 쓴다는 것이 다르다.
즉 맥에서는 っ 타이핑이 ltu 가 아니라 xtu 임.
키워드 : Mac, japanese, 入力
검색어 : 구글 > 日本語 タイピング mac romaji
かな文字の入力
윈도우와 거의 같으나
작은 문자를 쓸 때 l 대신 x 를 쓴다는 것이 다르다.
즉 맥에서는 っ 타이핑이 ltu 가 아니라 xtu 임.
키워드 : Mac, japanese, 入力
검색어 : 구글 > 日本語 タイピング mac romaji
Tuesday, April 27, 2010
맥에서 가끔 Control 키가 lock 걸리는 현상
질문 : 가끔씩 Control 키가 항상 눌려 있는 것 같은 상태가 되는 경우가 있다. (Control 키를 누르지 않았는데 눌려 있는 듯이 동작하는 상태) 이럴 때는 어떻게 해야 하나?
답 : 이럴 땐 Control 키를 한번 눌러주면 원래대로 돌아올 것이다. 이는 키보드 자체의 문제는 아니고 소프트웨어적인 문제 같다. Maya에서는 컨트롤 키를 눌러줘도 돌아오지 않는데 원인은 불명.
키워드 : ctrl, keyboard
답 : 이럴 땐 Control 키를 한번 눌러주면 원래대로 돌아올 것이다. 이는 키보드 자체의 문제는 아니고 소프트웨어적인 문제 같다. Maya에서는 컨트롤 키를 눌러줘도 돌아오지 않는데 원인은 불명.
키워드 : ctrl, keyboard
Saturday, April 17, 2010
Powerpoint에서 jpg으로 export할때 resolution
맥 버전의 파워포인트로 설명.
Powerpoint에서 jpg으로 export하는 것은
File > Save as Pictures...
하면 되고
export할때 resolution 은 Option 상자에서
직접 해상도를 정해주던가 dpi 를 정해주면 된다.
그런데 jpg 외의 다른 포맷 예를 들어 tif 포맷으로 export 하면
해상도를 컨트롤할 수가 없다.
Powerpoint에서 jpg으로 export하는 것은
File > Save as Pictures...
하면 되고
export할때 resolution 은 Option 상자에서
직접 해상도를 정해주던가 dpi 를 정해주면 된다.
그런데 jpg 외의 다른 포맷 예를 들어 tif 포맷으로 export 하면
해상도를 컨트롤할 수가 없다.
Sunday, April 11, 2010
Numbers 에서 첫 row 를 항상 보이게 하는 방법
위쪽 아이콘 맨 오른쪽에 보면 sheet 의 row 가 표시된 아이콘이 있는데
아래 화살표를 클릭하면 Freeze Header Rows 라는 항목이 있는데 거기 체크하면 된다.
아래 화살표를 클릭하면 Freeze Header Rows 라는 항목이 있는데 거기 체크하면 된다.
Saturday, April 10, 2010
Magic Mouse 와 같은 2 button mouse에서 Maya 사용하는 법
질문 : Magic Mouse 와 같은 2 button mouse에서 Maya 사용하는 법?
답 :
Window > Settings/Preferences > Preferences
에서
Interface 에 가서 맨 밑에 보면
Devices 에 2 button mouse 선택 가능함.
이 세팅을 쓰면
Pan : Option + Command + left click and drag
Rotate : Option + left click and drag
Zoom : 그냥 drag 또는 Option + right click and drag
로 컨트롤하면 된다.
인용 :
Depending on your Maya settings(Window->Settings->Preferences, I usually set my settings to a 2 button mouse)... then option + drag to rotate, option + two-finger drag to zoom, and option + command + one finger drag for pan.
Of course a mouse works best and don't forget to change back to a three button mouse in the Preferences.
출처 : Maya 8.5 macbook pro pan
Friday, April 9, 2010
달력 간편하게 만드는 법
cal 명령을 쓰면 된다.
달을 지정하려면, 예를 들어 지금이 4월인데 5월 달력을 찍고 싶다면 다음과 같이 한다.
cal -m may
키워드 : calendar
달을 지정하려면, 예를 들어 지금이 4월인데 5월 달력을 찍고 싶다면 다음과 같이 한다.
cal -m may
키워드 : calendar
Saturday, April 3, 2010
UNIX Shell script 한줄로 쓰는 방법
질문 : AppleScript 내에서 셸 스크립트를 여러 줄을 한줄로 써야할 경우가 있는데 어떻게 하면 좋은가?
답 : 다음과 같이 ; 로 분리하면 된다.
do shell script "F=\"file.name.txt\";EXT=`echo ${F##*.}`;echo $EXT"
답 : 다음과 같이 ; 로 분리하면 된다.
do shell script "F=\"file.name.txt\";EXT=`echo ${F##*.}`;echo $EXT"
Friday, April 2, 2010
맥에 외장하드를 꽂았는데 외장하드가 안보이는 경우 해결법
질문 : 맥에 외장하드를 꽂았는데 외장하드가 안보이는 경우 어떻게 하나?
답 : 간혹 그런 문제가 발생할 때가 있는데 그럴 땐
파인더에서 Command + Shift + g 를 누르고 거기에
/Volumes
를 입력하고 엔터.
그렇게 하면 외장하드가 인식되어 보일 것이다.
답 : 간혹 그런 문제가 발생할 때가 있는데 그럴 땐
파인더에서 Command + Shift + g 를 누르고 거기에
/Volumes
를 입력하고 엔터.
그렇게 하면 외장하드가 인식되어 보일 것이다.
Thursday, April 1, 2010
아래아 한글 Crash Course
Hwp 벼락치기로 익히기
요즘은 hwp를 잘 쓰지 않지만, 관공서 등에서 받은 문서파일은 hwp 파일로 되어 있어서 다루는데 애를 먹곤 한다. 여기서는 간단히 실전에 필요한 기능만 요약해본다.
문서 확대/축소 (줌인/줌아웃)
Ctrl + 마우스 휠
새 페이지 만들기
Ctrl + Enter 하면 됨
표 만드는 방법
메뉴 > 표 > 표 만들기
또는 아이콘을 누르면 됨
표를 좀더 쉽게 만드는 방법
Hwp의 훌륭한 기능 중의 하나가, 표 그리기 기능이다.
즉 원하는 레이아웃으로 선을 그으면 자유롭게 원하는 형태의 표를 만들 수 있다.
표의 특정 라인을 지우고 싶으면
표 그리기/지우기 모드에서 빠져나가려면, 그냥 ESC 를 누르면 된다.
표에 행을 추가하는 법
표 셀 안쪽에 커서가 있는 상태에서 Ctrl + Enter 하면 됨
커서가 안에 있는 상태에서 셀 선택하기
F5 를 누르면 됨. 한번 누르면 회색, 두번 누르면 빨간색, 세번 누르면 전체 셀이 빨간색이 되어 선택됨
셀 선택한 상태에서 에디트 모드로 가기
Enter 키 누르면 됨
셀의 크기 변경하는 법
워드와 마찬가지로, 그냥 선을 드래그하면 된다.
표의 라인 서식 변경하는 법
표를 만들고 표 가장자리의 서식을 점선 등으로 바꾸는 법을 알아보자.
1. 원하는 셀들을 선택한 후,
2. 선택된 상태에서 L을 누름
3. 그러면 셀 테두리 서식을 변경할 수 있는 창이 뜨는데
4. 여기서 테두리 유형을 선택하고
5. 그 유형을 적용할 라인을 선택하고 '적용'을 누르면 된다.
6. '설정'을 누르면 빠져나갈 수 있다.
표의 셀 색깔 바꾸는 법
L 누르고 배경 탭 누르면 여기서 색을 선택할 수 있다.
또는 그냥 C 를 누르면 된다.
표의 속성 단축키
표의 라인 속성은 L
표의 배경 속성은 C
셀 합치기
여러 셀들을 선택하고
오른버튼 누르고 셀 합치기 메뉴를 실행하거나
M 키를 치면 합쳐진다.
셀 나누기
한 셀을 선택하고
오른버튼 누르고 셀 나누기 메뉴를 실행하거나
S 키를 누르면 나눠진다.
그림 삽입하기
입력 > 개체 > 그림
그립/표 등의 개체를 글자 다루듯 쉽게 위치시키려면
오른버튼 > 개체 속성 > "글자처럼 취급"에 체크
글자 속성 핫키
Alt + L
머리말, 꼬리말 넣기
메뉴 > 모양 > 머리말/꼬리말
해서 넣으면 여기에 문서 제목 또는 페이지 수를 자동으로 넣을 수 있게 됨
페이지 아래쪽에 주석 넣기
입력 > 주석 > 각주
(지우려면 주석 도구상자에서 오른쪽에서 두번째의 지우개 클릭)
쪽수 넣기
메뉴 > 모양 > 쪽 번호 매기기
레퍼런스 :
아래아 한글 단축키
키워드 : 테이블, 핫키, "아래아한글 단축키 shortcuts hotkeys.jpg"
요즘은 hwp를 잘 쓰지 않지만, 관공서 등에서 받은 문서파일은 hwp 파일로 되어 있어서 다루는데 애를 먹곤 한다. 여기서는 간단히 실전에 필요한 기능만 요약해본다.
문서 확대/축소 (줌인/줌아웃)
Ctrl + 마우스 휠
새 페이지 만들기
Ctrl + Enter 하면 됨
표 만드는 방법
메뉴 > 표 > 표 만들기
또는 아이콘을 누르면 됨
표를 좀더 쉽게 만드는 방법
Hwp의 훌륭한 기능 중의 하나가, 표 그리기 기능이다.
메뉴 > 표 > 표 그리기
를 선택하면 커서가 연필 모양이 되면서 자유자재로 표를 그릴 수 있는 모드가 된다.즉 원하는 레이아웃으로 선을 그으면 자유롭게 원하는 형태의 표를 만들 수 있다.
표의 특정 라인을 지우고 싶으면
메뉴 > 표 > 표 지우기
를 선택하여, 지우고 싶은 라인 위로 지우개를 드래그하면 된다.표 그리기/지우기 모드에서 빠져나가려면, 그냥 ESC 를 누르면 된다.
표에 행을 추가하는 법
표 셀 안쪽에 커서가 있는 상태에서 Ctrl + Enter 하면 됨
커서가 안에 있는 상태에서 셀 선택하기
F5 를 누르면 됨. 한번 누르면 회색, 두번 누르면 빨간색, 세번 누르면 전체 셀이 빨간색이 되어 선택됨
셀 선택한 상태에서 에디트 모드로 가기
Enter 키 누르면 됨
셀의 크기 변경하는 법
워드와 마찬가지로, 그냥 선을 드래그하면 된다.
표의 라인 서식 변경하는 법
표를 만들고 표 가장자리의 서식을 점선 등으로 바꾸는 법을 알아보자.
1. 원하는 셀들을 선택한 후,
2. 선택된 상태에서 L을 누름
3. 그러면 셀 테두리 서식을 변경할 수 있는 창이 뜨는데
4. 여기서 테두리 유형을 선택하고
5. 그 유형을 적용할 라인을 선택하고 '적용'을 누르면 된다.
6. '설정'을 누르면 빠져나갈 수 있다.
표의 셀 색깔 바꾸는 법
L 누르고 배경 탭 누르면 여기서 색을 선택할 수 있다.
또는 그냥 C 를 누르면 된다.
표의 속성 단축키
표의 라인 속성은 L
표의 배경 속성은 C
셀 합치기
여러 셀들을 선택하고
오른버튼 누르고 셀 합치기 메뉴를 실행하거나
M 키를 치면 합쳐진다.
셀 나누기
한 셀을 선택하고
오른버튼 누르고 셀 나누기 메뉴를 실행하거나
S 키를 누르면 나눠진다.
그림 삽입하기
입력 > 개체 > 그림
그립/표 등의 개체를 글자 다루듯 쉽게 위치시키려면
오른버튼 > 개체 속성 > "글자처럼 취급"에 체크
글자 속성 핫키
Alt + L
머리말, 꼬리말 넣기
메뉴 > 모양 > 머리말/꼬리말
해서 넣으면 여기에 문서 제목 또는 페이지 수를 자동으로 넣을 수 있게 됨
페이지 아래쪽에 주석 넣기
입력 > 주석 > 각주
(지우려면 주석 도구상자에서 오른쪽에서 두번째의 지우개 클릭)
쪽수 넣기
메뉴 > 모양 > 쪽 번호 매기기
레퍼런스 :
아래아 한글 단축키
키워드 : 테이블, 핫키, "아래아한글 단축키 shortcuts hotkeys.jpg"
BOM값이 틀린 파일 확인법
인코딩 자체는 문제가 없는데 BOM(Byte order mark)이 인코딩과 일치하지 않는 경우가 있다. 다음과 같은 문제가 생기면 BOM이 잘못되었음을 알 수 있다.
1. text 파일의 경우
TextEdit 에서 열면 깨져보이는데
TextWrangler 에서 열면 제대로 보이는 파일은
BOM 이 잘못된 파일이다.
2. html 파일의 경우
Safari 에서 열면 깨져보이는데
FireFox 에서 열면 제대로 보이는 파일은
BOM 이 잘못된 파일이다.
키워드 : unicode, utf-8, 유니코드, Byte order mark
1. text 파일의 경우
TextEdit 에서 열면 깨져보이는데
TextWrangler 에서 열면 제대로 보이는 파일은
BOM 이 잘못된 파일이다.
2. html 파일의 경우
Safari 에서 열면 깨져보이는데
FireFox 에서 열면 제대로 보이는 파일은
BOM 이 잘못된 파일이다.
키워드 : unicode, utf-8, 유니코드, Byte order mark
유니코드로 변환시 BOM 값의 중요성
어떤 텍스트 파일이 UTF-8인지 등을 알아내려면 첫 세 바이트의
BOM (Byte Order Mark) 를 확인하면 알 수 있는데,
EUC-KR encoding 된 것을 UNIX의 iconv를 이용해 UTF-8 로 변환할 경우,
텍스트 파일 초반의 BOM 값까지 자동으로 써지지는 않는다.
iconv 만으로 convert 한 파일은 맥파인더의 space 바를 눌러 보는
프리뷰에서는 깨져 보이는데 그것은 BOM 값이 틀려 있기 때문이다.
따라서 BOM은 알아서 별도로 써줘야 한다.
다음은 UTF-8 의 BOM 값이다.
set BOM to ((ASCII character 239) & (ASCII character 187) & (ASCII character 191))
참고자료 : 유니코드 사용시 No BOM 이란
UNIX Shell에서 filename parse하기(filename only, extension 등 알아내기)
F="/Users/My Work/thisfile.txt"
dirname
DIRNAME=`dirname "$F"`
echo $DIRNAME
filename
FILENAME=`basename "$F"`
filenameOnly
FILENAME_ONLY=`basename "$FILENAME" .txt`
echo $FILENAME_ONLY
결과 : thisfile
extension
EXT=`echo ${F##*.}`
echo $EXT
결과 : txt
주의 :
간혹 어떤 레퍼런스에서는 파일 확장자를 얻어내는 명령을
EXT=`echo ${F#*.}`
라고 쓴 경우가 있는데 이건 잘못된 것이다.이렇게 하면
"file.name.txt" 같은 파일의 확장자가 name.txt 로 얻어져 버린다.
키워드 : 확장자, 디렉토리명, 파일명, 폴더명
레퍼런스 :
Short Tip: Get file extension in Shell script
-> 매우 다양한 방법이 나와 있음. UNIX Shell로 파일명 다루는데 좋은 참고자료.
Wednesday, March 31, 2010
UNIX Shell 에서 파일에 쓰기
http://www.computing.net/answers/unix/write-to-file/2878.html
echo `date` Success > logs.txt
echo `date` Success >> logs.txt
키워드 : Write to Text File
echo `date` Success > logs.txt
echo `date` Success >> logs.txt
키워드 : Write to Text File
bash String Manipulations 및 Tuesday's Tips for shell scripting
bash String Manipulations
dirname $f
basename $f
basename $f .txt
/home/myplace/a.data.directory
a.filename.txt
a.filename
Tuesday's Tips for shell scripting
셸 스크립트에서 printf 도 가능.
printf "%s\n" $A
다만 다음과 같은 multiline variable은 쓸수 없는듯
MYVAR=`printf "%s\n%s" $A $B`
최근 버전의 bash 에서는 다음과 같이 쓸수 있음
$ echo {1..13}
1 2 3 4 5 6 7 8 9 10 11 12 13
$ echo {z..o}
z y x w v u t s r q p o
랜덤 변수
echo $RANDOM
UNIX Shell의 regular expression과 한글
안되는 경우 메모.
다음은 되는데
cat "A_a"[a-z] > "동영상.avi"
다음은 되지 않는다.
cat "한_a"[a-z] > "동영상.avi"
다음은 되는데
cat "A_a"[a-z] > "동영상.avi"
다음은 되지 않는다.
cat "한_a"[a-z] > "동영상.avi"
UNIX Shell의 echo command와 newline
newline 없이 echo 하려면
-n : no newline
echo -n text
newline 을 찍어주려면
-e : enable backslash escapes
echo -e "This is line1\nAnd this is line 2"
-n : no newline
echo -n text
newline 을 찍어주려면
-e : enable backslash escapes
echo -e "This is line1\nAnd this is line 2"
AppleScript에서 스트링에 return, space, quote 쉽게 넣는 법
말 그대로, return, quote, space 라고 쓰면 된다.
예)
display dialog quote & "Love" & quote & space & "ME" & return & "HATE" & space & "YOU"
예)
display dialog quote & "Love" & quote & space & "ME" & return & "HATE" & space & "YOU"
UNIX Shell(bash) 에서 echo off 하는 방법
질문 : AppleScript에서 UNIX shell script 실행시 명령어를 표기하고 싶지 않을 경우, 어떻게 하나?
답 :
stty -echo
하면 된다.
다시 켜려면
stty echo
하면 된다.
답 :
stty -echo
하면 된다.
다시 켜려면
stty echo
하면 된다.
Monday, March 29, 2010
'MAC OS X'가 우아한 이유
좋은 글이라 링크 걸어둠 :
'MAC OS X'가 우아한 이유
인용 : 고도로 추상화된 OS 프레임워크 위에 유저의 컴퓨팅 환경을 극대화 해주는것. 그 것이 바로 맥입니다... 만일에 설치 경로가 맘에 들지 않는다면, 그냥 옮겨 주면 됩니다. 그렇게 하더라도, 윈도우의 바로가기 같은 가상본이라는 숏컷이 있지만, 자동으로 경로를 알아서 찾아 가게 됩니다. 만일 프로그램이 지워진다면 가상본은 자동으로 폭파 되는거죠. 프로그램의 이름이 바뀌어도 가상본은 자동으로 업데이트 됩니다. 사용자가 건들일 것은 전혀 없습니다...
'MAC OS X'가 우아한 이유
인용 : 고도로 추상화된 OS 프레임워크 위에 유저의 컴퓨팅 환경을 극대화 해주는것. 그 것이 바로 맥입니다... 만일에 설치 경로가 맘에 들지 않는다면, 그냥 옮겨 주면 됩니다. 그렇게 하더라도, 윈도우의 바로가기 같은 가상본이라는 숏컷이 있지만, 자동으로 경로를 알아서 찾아 가게 됩니다. 만일 프로그램이 지워진다면 가상본은 자동으로 폭파 되는거죠. 프로그램의 이름이 바뀌어도 가상본은 자동으로 업데이트 됩니다. 사용자가 건들일 것은 전혀 없습니다...
UNIX Shell 에서 현재 날짜 얻어내기
질문 : UNIX Shell에서 날짜를 얻어내려면 어떻게 하나?
답 :
date 명령을 쓴다. 그냥 date 만 실행하면
레퍼런스 : http://en.wikipedia.org/wiki/Date_%28Unix%29
답 :
date 명령을 쓴다. 그냥 date 만 실행하면
Mon Mar 29 07:14:23 KST 2010와 같이 나오므로, AppleScript 등이 다루기 쉬운 포맷된 형태로 얻고 싶으면
date "+%Y%m%d"와 같이 한다. 그러면
20100329와 같은 결과를 얻을 수 있다.
레퍼런스 : http://en.wikipedia.org/wiki/Date_%28Unix%29
AppleScript에서 셸스크립트 실행할때, 리턴값을 받으려면 어떻게 하나?
질문 :
AppleScript에서 do shell script 수행할 때, 셸스크립트에서 리턴값 받으려면 어떻게 하나?
답 :
do shell script 명령의 리턴값은
셸스크립트에서 echo 명령으로 찍어준 것이 모두 모인 스트링을 받게 된다.
따라서 shell script 끝부분에서 리턴하고자 하는 값을 echo 해주고,
AppleScript 에서는 그 받은 값을 원하는 타입으로 casting 해서 써주면 된다.
(as integer 같은 식으로)
주의점 :
셸스크립트 여러 곳에서 echo 명령을 쓰면, 그들 스트링이 다 concatenate 되어버려서
정확한 리턴값을 받을 수 없다.
키워드 : myFileExists
Sunday, March 28, 2010
AppleScript로 새 text파일 생성하기/ Date/Time 찍기
Creating files and writing to them from AppleScript is a little complicated. It's easier to use AppleScript for what it's really intended for: automating existing applications.
Or you could use the shell.
Simple Applescript: Create a .txt file
tell application "TextEdit"날짜 시간 찍는 방법에 대해 보충:
activateend tell
make new document
set theDate to current date
set text of document 1 to theDate as text
save document 1 in "/Users/robbie/Desktop/LastUpdate.txt"
Or you could use the shell.
do shell script "date > $HOME/Desktop/LastUpdate.txt"If you want a running record of when the updates were ran do this (double >> )
do shell script "date >> $HOME/Desktop/LastUpdate.txt"레퍼런스 :
Simple Applescript: Create a .txt file
AppleScript에서 스크립트 짠것을 source 를 공개안하고 실행파일만 배포할수 있나?
질문 :
스크립트를 다른 사람이 못읽게 하려면?
즉 실행 기능만 배포하려면?
답 :
저장시에 Run Only 옵션에 체크하면 된다.
그러나 이렇게 하면 다시는 소스를 볼 수 없으므로 반드시 카피본을 저장해두기 바란다.
Protecting your scripts from being read or changed
To protect your scripts from being read or changed, you can save them as “run-only.” Run-only scripts do not contain the readable text used in editing scripts. This can be useful if you have a script that works well and you don’t want it to be changed.
IMPORTANT:You will not be able to edit this script again if you choose Run Only. If you want to be able to change the script, be sure to save the run-only version as a copy with a different name and retain the original in the standard editable format.
출처 : AppleScript Editor Help > encoding
Saturday, March 27, 2010
AppleScript로 스트링 다루기
AppleScript Essentials Working With Text
by Benjamin S. Waldie
http://www.mactech.com/articles/mactech/Vol.21/21.07/WorkingWithText/index.html
이것이 string 다루는데 관련된 가장 좋은 튜토리얼로 보임.
본문중에서 :
The offset command is included in the String Commands suite in the Standard Additions scripting addition that is installed with Mac OS X.
last offset of 함수 구현한 것
http://www.alecjacobson.com/weblog/?p=49
by Benjamin S. Waldie
http://www.mactech.com/articles/mactech/Vol.21/21.07/WorkingWithText/index.html
이것이 string 다루는데 관련된 가장 좋은 튜토리얼로 보임.
본문중에서 :
The offset command is included in the String Commands suite in the Standard Additions scripting addition that is installed with Mac OS X.
set theFileName to "filename.jpg"레퍼런스 :
offset of "." in theFileName
--> 9
last offset of 함수 구현한 것
http://www.alecjacobson.com/weblog/?p=49
AppleScript 의 dialog 에서 여러줄의 메시지를 표시하는 법
다음과 같이 하면 된다.
display dialog "Line 1
Line 2
Line 3"
(Variable에도 이와 같이 개행문자 넣어줄 수 있다.)
또는,
display dialog "Line 1" & return & "Line 2" & return & "Line 3"
하면 된다.
후자의 방법이 코드를 관리하는 데는 더 깔끔하다.
참고할 것 :
AppleScript 에서 스트링에 return, space, quote 쉽게 넣는 법
레퍼런스 : AppleScript dialog - display multiline text in a dialog
키워드 : 개행문자, lines
검색어 : google > applescript dialog newline
AppleScript Drag and Drop Sample
애플스크립트에서 드래그 앤 드롭 하는 방법
Drag and drop AppleScript to convert video
on open these_items 이벤트를 사용
키워드 : drag-and-drop-apple-script-to-convert-video.html
Drag and drop AppleScript to convert video
on open these_items 이벤트를 사용
키워드 : drag-and-drop-apple-script-to-convert-video.html
Mac OS X에서 파일 아이콘 바꾸는 법
질문 : 개별 파일의 icon을 바꾸려면 어떻게 하는가?
답 :
Get info 창을 열면 왼쪽 위에 아이콘이 보이는데 그걸 선택하면 아이콘 이미지가 선택되는 것이다.
따라서 다른 파일의 Get info 창에서 이미지를 복사해서 다른 파일의 Get info 창의 이미지로
붙여넣기 할수도 있고 일반 이미지 파일에서 붙여넣기 할수도 있다.
답 :
Get info 창을 열면 왼쪽 위에 아이콘이 보이는데 그걸 선택하면 아이콘 이미지가 선택되는 것이다.
따라서 다른 파일의 Get info 창에서 이미지를 복사해서 다른 파일의 Get info 창의 이미지로
붙여넣기 할수도 있고 일반 이미지 파일에서 붙여넣기 할수도 있다.
ape, ogg, flac 등을 Mac에서 다루는 툴
사용법은 간단하다. 파일을 어플리케이션에 끌어 넣으면 변환이 된다.
flac 파일과 cue 파일이 있을 때는 cue 파일을 어플리케이션에 끌어 넣도록 한다 (flac 파일을 끌어넣으면 앨범 전체가 하나의 wav 파일이 되지만 cue 파일을 끌어넣으면 트랙별로 wav 파일이 만들어진다).
어플리케이션 설명:
X Lossless Decoder(XLD) is a tool for Mac OS X that is able to decode/convert/play various 'lossless' audio files. The supported audio files can be split into some tracks with cue sheet when decoding. It works on Mac OS X 10.3 and later.
XLD supports the following formats:
레퍼런스 :
FLAC (lossless) to iTunes Apple Lossless?
X Lossless Decoder: Lossless audio decoder for Mac OS X
SoundConverter도 좋아보이지만 유료임
flac 파일과 cue 파일이 있을 때는 cue 파일을 어플리케이션에 끌어 넣도록 한다 (flac 파일을 끌어넣으면 앨범 전체가 하나의 wav 파일이 되지만 cue 파일을 끌어넣으면 트랙별로 wav 파일이 만들어진다).
어플리케이션 설명:
X Lossless Decoder(XLD) is a tool for Mac OS X that is able to decode/convert/play various 'lossless' audio files. The supported audio files can be split into some tracks with cue sheet when decoding. It works on Mac OS X 10.3 and later.
XLD supports the following formats:
* (Ogg) FLAC (.flac/.ogg)다운로드 : X Lossless Decoder: Lossless audio decoder for Mac OS X
* Monkey's Audio (.ape)
* Wavpack (.wv)
* TTA (.tta)
* Apple Lossless (.m4a) [10.4 and later]
* AIFF, WAV, etc
레퍼런스 :
FLAC (lossless) to iTunes Apple Lossless?
X Lossless Decoder: Lossless audio decoder for Mac OS X
SoundConverter도 좋아보이지만 유료임
UNIX Shell 에서 arguments 다루기
script의 argument 및 argument 수 등 얻어내기
UNIX Shell 에서 if, elif(else if), else, fi 사용 및 condition 비교문
if...elif...fi condition in Unix
echo "num args : $#"설명 :
if [ $# -eq 3 ]; then
echo "arg3:"$3elif [ $# -eq 2 ]; then
echo "arg2:"$2else
echo "exception"fi
arguments의 수 : $#레퍼런스 :
첫번째 argument : $1
argument 가 file path일때 quoted path : "$1"
UNIX Shell 에서 if, elif(else if), else, fi 사용 및 condition 비교문
if...elif...fi condition in Unix
UNIX Shell 에서 if, elif(else if), else, fi 사용 및 condition 비교문
if문 사용법:
echo "num args : $#"비교문 :
if [ $# -eq 3 ]; then
echo "arg3:"$3elif [ $# -eq 2 ]; then
echo "arg2:"$2else
echo "exception"fi
is equal to: eq레퍼런스 : if...elif...fi condition in Unix
is not equal to: ne
is greater than: gt
is less than: lt
is greater than or equal to: ge
is less than or equal to: le
TextWrangler 에서 block indentation
질문 : TextWrangler 에서 block indentation 하는 shortcut은?
답 : Command + [, ]
키워드 : hotkey, 핫키, 쇼트컷
답 : Command + [, ]
키워드 : hotkey, 핫키, 쇼트컷
UNIX Shell(bash) 에서 filepath 를 directory명과 파일명으로 나누기
filepath=$1
dir=`dirname "$filepath"`
filename=`basename "$filepath"`
filenameonly=${filename%\.*}
ext=${filename##*.}
echo $dir
echo $filename
echo $filenameonly
echo $ext
dir=`dirname "$filepath"`
filename=`basename "$filepath"`
filenameonly=${filename%\.*}
ext=${filename##*.}
echo $dir
echo $filename
echo $filenameonly
echo $ext
while loop 조건에 not 조건 넣는 법
while loop 조건에 not 조건 넣는 법
[ -f $FILE ] 는 argument 로 주어진 파일이 존재하는지 여부를 알려주고
while loop 은 그 파일이 존재하지 않는 동안 loop 함.
while !([ -f "$FILE" ]);-> 코드 자체는 별 의미 없음.
do
echo "inside loop"done
break
[ -f $FILE ] 는 argument 로 주어진 파일이 존재하는지 여부를 알려주고
while loop 은 그 파일이 존재하지 않는 동안 loop 함.
UNIX Shell Script에서 여러줄 comment 하는 법
:<<COMMENT
a line in the script.another line in the script
.
.
yet another line in script.
COMMENT
주의점:
:<<COMMENT와 COMMENT는 indent 하지 말 것.
indent 하면 comment 로 인식이 안되어 오동작한다.
키워드 : multiple lines, 주석
레퍼런스 : http://www.unix.com/shell-programming-scripting/33757-commenting-more-then-1-line.html
파일이 존재하는지 체크
Find out if file /etc/passwd file exists or not
Type the following commands:
Type the following commands:
레퍼런스 : Linux/UNIX: Find Out If File Exists With Conditional Expressions
Type the following commands:
$ [ -f /etc/passwd ] && echo "File exists" || echo "File does not exists"Find out if directory /var/logs exists or not
$ [ -f /tmp/fileonetwo ] && echo "File exists" || echo "File does not exists"
Type the following commands:
$ [ -d /var/logs ] && echo "Directory exists" || echo "Directory does not exists"다음과 같이 짤수 있음.
$ [ -d /dumper/fack ] && echo "Directory exists" || echo "Directory does not exists"
#!/bin/bash키워드 : check, shell
FILE=$1
if [ -f $FILE ];
then
echo "File $FILE exists"else
echo "File $FILE does not exists"fi
레퍼런스 : Linux/UNIX: Find Out If File Exists With Conditional Expressions
MIME Type 이란 무엇인가?
MIME types
MIME types are widely used in many Internet-related applications, and increasingly elsewhere, although their usage for on-disc type information is rare. These consist of a standardised system of identifiers (managed by IANA) consisting of a type and a sub-type, separated by a slash — for instance, text/html or image/gif. These were originally intended as a way of identifying what type of file was attached to an e-mail, independent of the source and target operating systems. MIME types identify files on BeOS, AmigaOS 4.0 and MorphOS, as well as store unique application signatures for application launching. In AmigaOS and MorphOS the Mime type system works in parallel with Amiga specific Datatype system.
There are problems with the MIME types though; several organisations and people have created their own MIME types without registering them properly with IANA, which makes the use of this standard awkward in some cases.
Thursday, March 25, 2010
AppleScript에서 다른 스크립트를 로드하는 법
AppleScript에서 다른 스크립트를 로드해서 실행하는 법.
이렇게 하면 큰 프로그램을 여러 파일로 쪼개어 관리할 수 있다.
call another applescript
how to divide very large AppleScript?
이렇게 하면 큰 프로그램을 여러 파일로 쪼개어 관리할 수 있다.
(*
--사용예. 다음과 같이 다른 스크립트를 로드해서
set myScript to myLoadOtherScript("myappCreateFileLib.scpt")
--다음과 같이 사용한다.
set filepath to myScript's myFileOpenDialog()
set newFilepath to myScript's myPrefixAddToFilename("my copy of ", filepath)
myScript's myFileCopy(filepath, newFilepath)
*)
on myLoadOtherScript(scriptLocalpath)레퍼런스 : AppleScript 'path to me' function changed in 10.5 System 10.5
set thisscriptpath to POSIX path of (path to me)end myLoadOtherScript
set dirname to do shell script "dirname " & quoted form of thisscriptpath
display dialog dirname
set filepath to dirname & "/" & scriptLocalpath
display dialog filepath
set myScript to load script (filepath as POSIX file)
return myScript
call another applescript
how to divide very large AppleScript?
AppleScript 에서 script 자신의 path 를 알아내는 법
path to me 함수를 쓰면 된다.
사용예 :
AppleScript 에서 다른 스크립트를 로드하는 법
레퍼런스 :
AppleScript 'path to me' function changed in 10.5 System 10.5
사용예 :
set thisscriptpath to POSIX path of (path to me)좋은 응용예:
set dirname to do shell script "dirname " & quoted form of thisscriptpath
display dialog dirname
AppleScript 에서 다른 스크립트를 로드하는 법
레퍼런스 :
AppleScript 'path to me' function changed in 10.5 System 10.5
Wednesday, March 24, 2010
인터넷에서 받은 이미지 파일의 확장자가 잘못되었거나 없는 것을 correct해주는 AppleScript
다음은, 인터넷에서 받은 Image File이 Extension이 없거나, 잘못되어있는 것을 correct 해주는 script이다.
여기에는 버그가 있는데
set myType to mySubstringBetweenFirstDelimiters(myTypeString, "image/", ";")
와 같은 함수를 사용해서 image/jpeg;
와 같은 부분만 추출해야 할 필요가 있다.
레퍼런스 :
http://henrik.nyh.se/2008/11/extension-action -> 설명
http://gist.github.com/27558 -> 소스코드
on adding folder items to myFolder after receiving myFiles버그 :
repeat with myFile in myFilesend adding folder items to
set myPath to (POSIX path of myFile)end repeat
set myType to do shell script "file --mime -br " & (quoted form of myPath)
if myType is "image/jpeg" and myPath does not end with ".jpg" and myPath does not end with ".jpeg" then
set newExtension to ".jpg"else if myType is "image/gif" and myPath does not end with ".gif" then
set newExtension to ".gif"else if myType is "image/png" and myPath does not end with ".png" then
set newExtension to ".png"else
set newExtension to nullend if
tell application "Finder"
if newExtension is not null thenend tell
set name of myFile to (name of myFile) & newExtensionend if
여기에는 버그가 있는데
set myType to mySubstringBetweenFirstDelimiters(myTypeString, "image/", ";")
와 같은 함수를 사용해서 image/jpeg;
와 같은 부분만 추출해야 할 필요가 있다.
레퍼런스 :
http://henrik.nyh.se/2008/11/extension-action -> 설명
http://gist.github.com/27558 -> 소스코드
AppleScript 이용, Photoshop 으로 이미지 파일 열기
Photoshop 으로 이미지 파일 열기
set theImage to choose file with prompt "Please select an image file:"
tell application "Adobe Photoshop CS4"
-- open theImageend tell
open theImage showing dialogs never
AppleScript에서 Photoshop 이용해서 특정 해상도로 image resize 해주기
포토샵을 이용해, Resolution 을 직접 지정해서 resize 해주는 예:
다음은 레퍼런스에 있던 원래 코드. 잘 안된다고 함.
Resize Image in Photoshop
myResizeImage(200, 100)
on myResizeImage(newWidth, newHeight)
tell application "Adobe Photoshop CS4"end myResizeImage
set myDoc to current documentend tell
set oldUnits to ruler units of settings
set ruler units of settings to pixel units
tell myDoc
set {w, h} to {width, height}end tell
resize image myDoc width newWidth height newHeight resample method bicubic sharper
set ruler units of settings to oldUnits
다음은 레퍼런스에 있던 원래 코드. 잘 안된다고 함.
-- ========================레퍼런스 :
-- Create and save the 20 Mb file
-- ========================
tell application "Adobe Photoshop CS2"
set doc20 to current documentend tell
-- Resize to 20 Mb
set oldUnits to ruler units of settings
set ruler units of settings to pixel units
tell doc20
set {w, h} to {width, height}end tell
-- newWidth is calculated based on the following formulas
-- 20Mb = ( 3 * (prct*w) * (prct*h) ) / 1024^2
-- newWidth = prct * w
set newWidth to ((20971520 / (w * h * 3)) ^ 0.5) * w
resize image doc20 width newWidth resolution 300 resample method bicubic sharper -- Works up to here
set ruler units of settings to inch units
resize image doc20 width oldWidth resample method none -- Errors on this line
set ruler units of settings to oldUnits
Resize Image in Photoshop
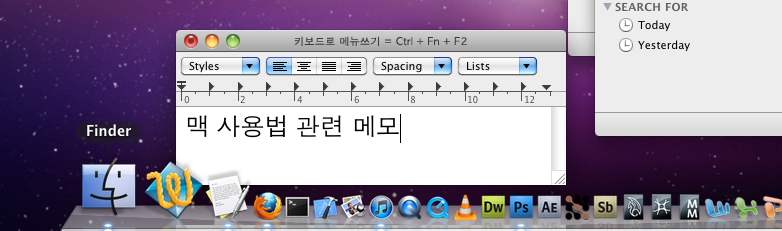
Mac OS X에서 Keyboard로 menu를 activate하는 방법은?

질문 : 마우스 배터리가 떨어져서 키보드로 메뉴를 액세스하려 한다.
윈도우에서는 windows 키를 누르면 되는데, 맥에서는 어떻게 하나?
답 : 맥에서는, Control + F2 를 하면 된다.
(Apple Wireless Keyboard 에서는 Control + Fn + F2 누르면 됨)
키워드 : shortcut, hotkey, 핫키, 쇼트컷, activation, mouse, battery
맥이 Shutdown 되지 않을 경우, 가장 안전하게 끄는 방법
질문 :
키보드도 반응이 없고 셧다운도 되지 않는데,
이럴때는 어떻게 하는 것이 가장 안전하게 끌 수 있는가?
답 :
파워 버튼을 누르면 sleep mode 가 되는데 그 상태에서는 하드가 파킹되므로
그때 전원 익스텐션을 끈다던가 해서 꺼주면 된다.
키보드도 반응이 없고 셧다운도 되지 않는데,
이럴때는 어떻게 하는 것이 가장 안전하게 끌 수 있는가?
답 :
파워 버튼을 누르면 sleep mode 가 되는데 그 상태에서는 하드가 파킹되므로
그때 전원 익스텐션을 끈다던가 해서 꺼주면 된다.
Tuesday, March 23, 2010
Mac OS X Terminal에서 외장하드 unmount 하는 방법
1. Terminal 에서 df 를 하면 마운트된 모든 disk들이 보인다.
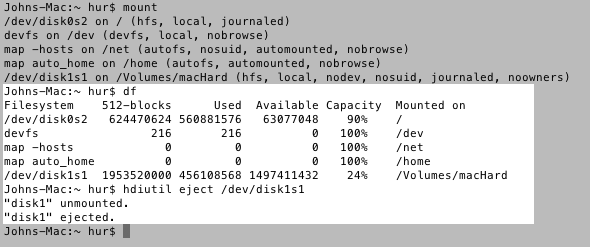
2. 맨 왼쪽에 있는 것이 disk의 full unix name 인데,
3. hdiutil eject [디스크의 full unix name] 과 같이 하면 된다.
예:
hdiutil eject /dev/disk1s1
참고 : mount 명령
옵션 없이 mount 명령을 써도 현재 마운트된 하드들이 보이지만, 알아보기가 힘들다.
참고 : 터미널에서 외장하드 액세스하기
ls /Volumes
명령을 쓰면 현재 사용중인 드라이브 목록을
더 알아보기 쉽게 볼 수 있다.
cd /Volumes
로 들어가서 외장하드에 직접 액세스할 수 있다.
2. 맨 왼쪽에 있는 것이 disk의 full unix name 인데,
3. hdiutil eject [디스크의 full unix name] 과 같이 하면 된다.
예:
hdiutil eject /dev/disk1s1
참고 : mount 명령
옵션 없이 mount 명령을 써도 현재 마운트된 하드들이 보이지만, 알아보기가 힘들다.
참고 : 터미널에서 외장하드 액세스하기
ls /Volumes
명령을 쓰면 현재 사용중인 드라이브 목록을
더 알아보기 쉽게 볼 수 있다.
cd /Volumes
로 들어가서 외장하드에 직접 액세스할 수 있다.
Copy Finder Path to Clipboard
다음과 같은 스크립트를

항상 실행하기 쉽도록 다음과 같이 파인더에 shortcut을 넣어두면 편하다.

레퍼런스 : Copy Finder Path to Clipboard – Tip 1
항상 실행하기 쉽도록 다음과 같이 파인더에 shortcut을 넣어두면 편하다.
레퍼런스 : Copy Finder Path to Clipboard – Tip 1
Mac terminal 또는 AppleScript에서 Screen Resolution 알아내는 방법
다음을 터미널에서 실행하면, width와 height를 각각 얻어낸다.
system_profiler SPDisplaysDataType | awk '/Resolution/{print $2}'애플스크립트에서는 다음과 같이 하면 된다.
system_profiler SPDisplaysDataType | awk '/Resolution/{print $4}'
on myGetScreenResolutionW()
return (do shell script "system_profiler SPDisplaysDataType | awk '/Resolution/{print $2}'") as integerend myGetScreenResolutionW
on myGetScreenResolutionH()
return (do shell script "system_profiler SPDisplaysDataType | awk '/Resolution/{print $4}'") as integerend myGetScreenResolutionH
AppleScript로 Finder띄워 Folder 자동으로 여는 방법
다음과 같이 한다.
여기서는 screen의 resolution을 predefined 값으로 입력했는데, 시스템에서 얻어내는 방법은 여기에 있다.
레퍼런스 :
Quickly and Neatly Open Two Pre-Specified Finder Windows Via Applescript
property monitor_width : 1680 --set to your display resolution width
property monitor_height : 1050 --set to your display resolution height
set p1 to "/Volumes/DOWNLOADING/_NEW/" --set folder for finder window 1, spaces are okay in folder path
set a to POSIX file p1
set p2 to "/Volumes/Drobo/TV/" --set folder for finder window 2, spaces are okay in folder path
set b to POSIX file p2
tell application "Finder"
activate
tell application "Finder" --remove this tell statement if you don't want all other open finder windows to close automatically
repeat while window 1 exists
close window 1
end repeat
end tell
set this_window to make new Finder window
set the target of this_window to the a
set the bounds of this_window to {100, 50, (monitor_width div 2), (monitor_height div 1)} --edit these setting to change the size of finder window 1
set the current view of this_window to column view --change if you don't want column view
set this_window to make new Finder window
set the target of this_window to the b
set the bounds of this_window to {850, 50, (monitor_width div 1.03), (monitor_height div 1)} --edit these setting to change the size of finder window 2
set the current view of this_window to column view --change if you don't want column view
end tell
여기서는 screen의 resolution을 predefined 값으로 입력했는데, 시스템에서 얻어내는 방법은 여기에 있다.
레퍼런스 :
Quickly and Neatly Open Two Pre-Specified Finder Windows Via Applescript
AppleScript로 Finder 컨트롤하기
AppleScript로 Finder 컨트롤하기
Using AppleScript to control the Finder, Five AppleScript Tips in Five Days
tell application "Finder"레퍼런스 :
close every windowend tell
open home
tell the front Finder window
set toolbar visible to trueend tell
set the sidebar width to 135
set the current view to column view
set the bounds to {36, 116, 511, 674}
open folder "Documents" of home
tell the front Finder window
set toolbar visible to falseend tell
set the current view to flow view
set the bounds to {528, 116, 1016, 674}
select the last finder window
Using AppleScript to control the Finder, Five AppleScript Tips in Five Days
Monday, March 22, 2010
AppleScript Editor에서 간편하게 값을 찍어볼 수 있는 방법?
AppleScript Editor에서는 디버깅 기능이 없으므로 값을 찍어서
밑의 event log 창에서 보는 기능이 요긴하다.
(복잡한 메시지가 많으면 Events 또는 Result 라고 써진 버튼을 눌러볼 것.
그러면 단순하게 볼 수 있다.)
키워드 : debugging, debugger, log, events, 이벤트 로그
레퍼런스 : http://aurelio.net/doc/as4pp.html
밑의 event log 창에서 보는 기능이 요긴하다.
log "I am a boy"과 같이 쓰면 되고 밑의 Event Log 창에서 보면 된다.
(복잡한 메시지가 많으면 Events 또는 Result 라고 써진 버튼을 눌러볼 것.
그러면 단순하게 볼 수 있다.)
키워드 : debugging, debugger, log, events, 이벤트 로그
레퍼런스 : http://aurelio.net/doc/as4pp.html
AppleScript에서 message box로 input받기
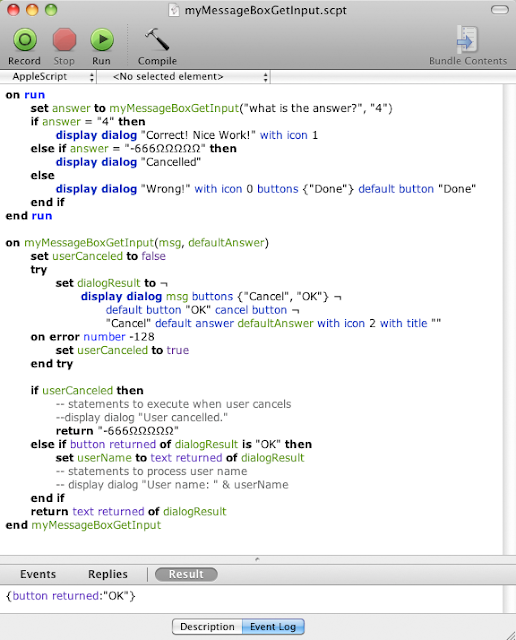
주의 : text returned 가 없으면 제대로 동작하지 않는다.
레퍼런스 : AppleScript Tutorial: Display Dialog and Returning Values
AppleScript에서 string contatenation 하는 법
질문 : AppleScript에서 string contatenate 하려면?
답 :
set result to stringA & stringB
와 같이 한다.
레퍼런스 :
Concatenate two strings
답 :
set result to stringA & stringB
와 같이 한다.
레퍼런스 :
Concatenate two strings
AppleScript의 loop에서 break 하는 법?
질문 : AppleScript의 loop에서 break 하려면?
답 : repeat 문에서 빠져나오려면 exit repeat 하면 된다.
레퍼런스 :
Using Repeat Loops in AppleScript
답 : repeat 문에서 빠져나오려면 exit repeat 하면 된다.
레퍼런스 :
Using Repeat Loops in AppleScript
Mac OS X에서 Option key 를 이용한 특수문자 입력
주의 :
이 포스트는 윈도우에서는 문자가 깨져나오거나 표기되지 않을 수 있으므로
반드시 맥에서 볼 것
Option + L : ¬
AppleScript 에서 line 을 잇는 역할을 하는 문자이다.
Option + \ : «
Shift 를 함께 누르면 » 가 입력된다.
역시 AppleScript 에서 사용되는 문자이다.
Option + = : ≠
AppleScript 에서 A != B 를 나타낼때 A ≠ B 와 같이 쓴다.
A is not equal B 로 써도 된다.
Option + s : ß
독일어의 ss 발음 나는 기호. 베타 기호같이 생겼다 (병용 가능?)
Option + z : Ω
오메가 기호.
(이 포스트는 아직 미완성.)
Add a 'Go to Parent Folder' button to the toolbar
AppleScript 를 이용한 재미있는 tip 이 있다.
Add a 'Go to Parent Folder' button to the toolbar
다음과 같이 parent directory 로 올라가는 버튼을 추가하는 것.

키워드 : 윈도우, Windows, Mac OS X, Finder, 파인더
Add a 'Go to Parent Folder' button to the toolbar
다음과 같이 parent directory 로 올라가는 버튼을 추가하는 것.
키워드 : 윈도우, Windows, Mac OS X, Finder, 파인더
맥과 PC를 한 컴퓨터처럼 사용하기
재미있는 제품이 있다.
맥과 PC를 한 컴퓨터처럼 사용하기
하나의 키보드와 마우스로 맥과 피씨를 동시에 제어할수 있는 제품이다.
놀라운 것은, 서로간에 copy and paste도 가능하다는 것이다.
인용 :
클릭손(http://www.clixon.co.kr) VCC(Virtual Console Connection)-400은 두 대의 윈도우, 맥OS 또는 리눅스 컴퓨터를 전용 고속 (100Mbps) 데이터 케이블로 연결하여,
1) 한쪽 컴퓨터에 연결된 키보드와 마우스로 듀얼 모니터 사용하듯이 편리하게 두 컴퓨터를 제어할 수 있게 하며,
2) 드래그-앤-드롭 (Drag-and-Drop) 기능을 이용하여 컴퓨터끼리 서로 쉽게 파일/폴더를 복사할 수 있습니다.(윈도우 컴퓨터끼리만 해당)
3) 또한, 두 컴퓨터의 클립보드 내용을 공유함으로써 파일, 글자, 이미지 등을 한쪽 컴퓨터에서 복사하여 다른 쪽 컴퓨터의 원하는 곳에 쉽게 붙여넣기를 할 수 있습니다.
4) 뿐만 아니라, 한쪽 컴퓨터에 연결된 인터넷 연결을 인터넷에 연결되지 않은 컴퓨터와 공유하여 사용할 수 있게 합니다.
따라서, 두 대의 서로 다른 컴퓨터를 마치 듀얼 모니터가 연결된 한 대의 컴퓨터처럼 두 컴퓨터를 사용할 수 있게 하여 두 대 컴퓨터 사용자의 작업 효율성을 극대화 해주는 제품입니다.
출처 :
http://www.clixon.co.kr
맥과 PC를 한 컴퓨터처럼 사용하기
맥과 PC를 한 컴퓨터처럼 사용하기
하나의 키보드와 마우스로 맥과 피씨를 동시에 제어할수 있는 제품이다.
놀라운 것은, 서로간에 copy and paste도 가능하다는 것이다.
인용 :
클릭손(http://www.clixon.co.kr) VCC(Virtual Console Connection)-400은 두 대의 윈도우, 맥OS 또는 리눅스 컴퓨터를 전용 고속 (100Mbps) 데이터 케이블로 연결하여,
1) 한쪽 컴퓨터에 연결된 키보드와 마우스로 듀얼 모니터 사용하듯이 편리하게 두 컴퓨터를 제어할 수 있게 하며,
2) 드래그-앤-드롭 (Drag-and-Drop) 기능을 이용하여 컴퓨터끼리 서로 쉽게 파일/폴더를 복사할 수 있습니다.(윈도우 컴퓨터끼리만 해당)
3) 또한, 두 컴퓨터의 클립보드 내용을 공유함으로써 파일, 글자, 이미지 등을 한쪽 컴퓨터에서 복사하여 다른 쪽 컴퓨터의 원하는 곳에 쉽게 붙여넣기를 할 수 있습니다.
4) 뿐만 아니라, 한쪽 컴퓨터에 연결된 인터넷 연결을 인터넷에 연결되지 않은 컴퓨터와 공유하여 사용할 수 있게 합니다.
따라서, 두 대의 서로 다른 컴퓨터를 마치 듀얼 모니터가 연결된 한 대의 컴퓨터처럼 두 컴퓨터를 사용할 수 있게 하여 두 대 컴퓨터 사용자의 작업 효율성을 극대화 해주는 제품입니다.
출처 :
http://www.clixon.co.kr
맥과 PC를 한 컴퓨터처럼 사용하기
Sunday, March 21, 2010
AppleScript 연습 : Substring 함수 구현/String을 character의 list로 만들기
다음과 같이 한다.
참고로, the_array 라고 단순히 쓴 것은 return the_array 와 동일하며
함수의 리턴값을 돌려주는 기능이다. 여기서는 실제로 함수로 쓰이지는 않았다.
인용 : You don't use arrays in AppleScript. The closest thing is list.
레퍼런스 : Strings and Arrays - how do you fill a string to an array by each letter?
set the_string to "Megadeth rocks!"결과 : {"M", "e", "g", "a", "d", "e", "t", "h", " ", "r", "o", "c", "k", "s", "!", "", "", "", "", "", "", "", "", "", "", "", "", "", "", "", "", ""}
set the_array to {}
repeat 32 times
set end of the_array to ""end repeat
repeat with i from 1 to (length of the_string)
set item i of the_array to Substring(the_string, i, 1)end repeat
the_array
----------
on Substring(the_string, start_point, the_length)
return (text start_point thru (start_point + the_length - 1) of the_string)end Substring
참고로, the_array 라고 단순히 쓴 것은 return the_array 와 동일하며
함수의 리턴값을 돌려주는 기능이다. 여기서는 실제로 함수로 쓰이지는 않았다.
인용 : You don't use arrays in AppleScript. The closest thing is list.
레퍼런스 : Strings and Arrays - how do you fill a string to an array by each letter?
AppleScript의 property 변수
property 로 정의한 variable 은 그 값이 저장되어 있다.
따라서 AppleScript Editor 에서 Command + R 로 거듭 실행하면 그때마다 값이 올라간다.
Hi there, with applescript you can declare variables as properties. this means that the value of the variable is not reset every time you restart a script but every time you recompile it. this offers a convenient way to store data.
레퍼런스 :
applescript property declaration
Basic AppleScript information and syntax - built-in basic events
따라서 AppleScript Editor 에서 Command + R 로 거듭 실행하면 그때마다 값이 올라간다.
substitute()인용 :
property var : 0
on substitute()
set var to var + 1end substitute
return var
Hi there, with applescript you can declare variables as properties. this means that the value of the variable is not reset every time you restart a script but every time you recompile it. this offers a convenient way to store data.
레퍼런스 :
applescript property declaration
Basic AppleScript information and syntax - built-in basic events
AppleScript에서 variable에 값 주기:set and copy
set 의 예
set 은 reference 를 생성하고 copy 는 값을 카피하는 것이다.
복잡한 오브젝트에서는 큰 차이가 난다.
레퍼런스 : Basic AppleScript information and syntax
-- integer (integer numbers)set 와 copy
set x to 5
-- real (real numbers)
set x to 3.57
-- characters (single characters)
set x to "f"
-- strings
set x to "The Hitch-hicker's Guide To The Galaxy"
-- lists (array)
set x to {"foo",2,3.57}
set 은 reference 를 생성하고 copy 는 값을 카피하는 것이다.
copy "Hello world" to x간단한 값에서는 차이가 거의 없지만
복잡한 오브젝트에서는 큰 차이가 난다.
레퍼런스 : Basic AppleScript information and syntax
AppleScript에서 Search and Replace 하기
AppleScript에는 regular expression이 없지만, 다음과 같이 search and replace 할수 있다.
레퍼런스 :
Read and write text files with AppleScript
display dialog ( my searchAndReplace("my mommy", "my", "your") )
on searchAndReplace( txt, srch, rpl )
set oldtid to AppleScript's text item delimitersend searchAndReplace
set AppleScript's text item delimiters to {srch}
set temp to every text item of txt
set AppleScript's text item delimiters to {rpl}
set temp to (temp as string)
set AppleScript's text item delimiters to oldtid
return temp
레퍼런스 :
Read and write text files with AppleScript
AppleScript에서의 for loop
for loop은 다음과 같이 사용한다.
레퍼런스 :
repeat 문의 좋은 예는 여기 있다:
AppleScript 연습 : String의 character를 하나하나 list의 멤버로 분리하기
set sum to 0
repeat with i from 1 to 5
set sum to sum + iend repeat
display dialog "The sum of the first five number is " & sum & "." buttons {"OK"} default button 1
레퍼런스 :
repeat 문의 좋은 예는 여기 있다:
AppleScript 연습 : String의 character를 하나하나 list의 멤버로 분리하기
AppleScript에서 List 사용법
List를 만들고 element 를 access 하는 법은 다음과 같다.
AppleScript 의 List 는 0 base가 아니라 1 base 이다.
사용하였기 때문이다. 예를 들어 property로 정의하지 않고 다음과 같이 하면,
다음과 같은 에러가 난다.
Getting the List of It
AppleScript 의 List 는 0 base가 아니라 1 base 이다.
property theList : {"One", "two"}참고로, 위에서 property 변수를 쓴 이유는 showNthItem(n) 이벤트를
showNthItem(1)
showNthItem(2)
on showNthItem(n)
set theItem to (item n of theList) as textend showNthItem
display dialog theItem
사용하였기 때문이다. 예를 들어 property로 정의하지 않고 다음과 같이 하면,
set theList to {"One", "two"}theList는 showNthItem() 내에서는 scope 때문에 보이지 않기 때문인지
다음과 같은 에러가 난다.
error "The variable theList is not defined."다음과 같이 하면 property 를 쓰지 않고도 제대로 됨.
set x to {"foo", 2, 3.57}다음은 List에 동적으로 값 넣는 법.
set theList to {"One", "two"}
set theItem to (item 1 of theList) as text
display dialog theItem
set yourList to {}레퍼런스 :
set the end of yourList to "111"
set the end of yourList to "2222"
showNthItem(yourList, 1)
showNthItem(yourList, 2)
Getting the List of It
AppleScript에서 Text File Read/Write 하기
AppleScript에서 text File을 읽고 쓰려면 다음과 같이 한다.
on ~ end 는 event 이다. 사용자가 만든 event는 function을 이용한 모듈화와도 같다.
(on run ~ end 같은, built-in event 도 있다(출처))
Text File 읽어서 Dialog Box 에 보여주는 스크립트
다음과 같이 as
즉 줄단위로 얻어내는 방법. 다음과 같이 하면 된다.
다음과 같이 UNIX를 이용하여 파일을 읽는 방법도 있다.
Read and write text files with AppleScript
Getting the List of It
Basic AppleScript information and syntax - built-in basic events
on ~ end 는 event 이다. 사용자가 만든 event는 function을 이용한 모듈화와도 같다.
(on run ~ end 같은, built-in event 도 있다(출처))
Text File 읽어서 Dialog Box 에 보여주는 스크립트
set filename to chooseFile()유니코드와 UTF-8
display dialog readFile(filename)
on chooseFile()
set filechosen to choose fileend chooseFile
set filename_ to (filechosen as text)
set filename to POSIX path of filename_
return filename
on readFile(unixPath)
set foo to (open for access (POSIX file unixPath))end readFile
set txt to (read foo for (get eof foo)as«class utf8»)
close access foo
return txt
다음과 같이 as
«class utf8» 옵션 없이 하면 "Mac OS Roman" encoded 파일밖에 못읽는다.set txt to (read foo for (get eof foo))다음과 같이 하면 Utf-16 포맷을 읽을 수 있다.
set txt to (read foo for (get eof foo) as Unicode text)Text의 모든 paragraph를 list로 분리하여 얻어내기
즉 줄단위로 얻어내는 방법. 다음과 같이 하면 된다.
set filename to chooseFile()UNIX 이용하기
set fileContent to readFile(filename)
set theList to every paragraph of fileContent
set firstItem to (item 1 of theList) as text
display dialog firstItem
다음과 같이 UNIX를 이용하여 파일을 읽는 방법도 있다.
on readFile( unixPath )레퍼런스 :
return (do shell script "cat '" & unixPath & "'")end
Read and write text files with AppleScript
Getting the List of It
Basic AppleScript information and syntax - built-in basic events
AppleScript에서 File Open Dialog Box 스타일로 파일명 얻어내기
choose file 을 사용하면 된다.
choose file 은 AppleScript 로 이미지 리사이즈하는 코드 자동생성하기 에 처음 나왔다.
Prompt 를 함께 주려면 다음과 같이 한다.
choose file 은 AppleScript 로 이미지 리사이즈하는 코드 자동생성하기 에 처음 나왔다.
Prompt 를 함께 주려면 다음과 같이 한다.
set TheFile to (choose file with prompt "Choose a file for Conversion")텍스트 파일만 얻어내려면
set the_posix_file to POSIX path of TheFile
display dialog the_posix_file
set TheFile to (choose file with prompt "Select the file:" of type {"TEXT"}) as string
display dialog TheFile
AppleScript에서 Desktop path 얻어내기
다음과 같이 하면 desktop 의 path 를 얻어낼 수 있다.
set out_path to path to desktop
set out_path_posix to (POSIX path of out_path & "test")
display dialog ("Desktop path is : " & out_path_posix)
Terminal 또는 AppleScript에서 Spotlight 기능 사용하기
터미널의 mdfind 명령으로 Spotlight 기능을 이용할 수 있다.
다음은 anatomy 라는 글이 들어간 파일을 검색해주는 스크립트.
Understanding mdfind
http://homepage.mac.com/swain/Macinchem/Applescript/AppScript_tut/AppScrip_tut_2/appscript_tut_2.htm
다음은 anatomy 라는 글이 들어간 파일을 검색해주는 스크립트.
set the_script to "mdfind 'anatomy'"레퍼런스 :
set the_text to (do shell script the_script)
set num_records to count of paragraphs in the_text
display dialog ("Number of found : " & num_records)
Understanding mdfind
http://homepage.mac.com/swain/Macinchem/Applescript/AppScript_tut/AppScrip_tut_2/appscript_tut_2.htm
AppleScript에서 Clipboard 사용하기
클립보드 사용예 (한글 모아쓰기를 위해 clipboard 사용해본 예)
http://pc-to-mac-changer.blogspot.com/2011/04/applescript.html 참조
사용예
AppleScript에서 클립보드에 원하는 텍스트를 다음과 같이 넣어줄 수 있다.
다음과 같이 한 후 텍스트 에디터에 paste하면 달력을 텍스트 형식으로 넣게 된다.
이것을 이용한 것이다.
set the clipboard to txt -- 한글 모아주기를 위해 클립보드로 옮김-> 실제 사용할때는 원래 있던 클립보드의 내용을 피신시키는 걸 잊지 말것
set txt to the clipboard as string -- 한글 모아주기가 완성.
http://pc-to-mac-changer.blogspot.com/2011/04/applescript.html 참조
사용예
AppleScript에서 클립보드에 원하는 텍스트를 다음과 같이 넣어줄 수 있다.
다음과 같이 한 후 텍스트 에디터에 paste하면 달력을 텍스트 형식으로 넣게 된다.
set the_text to (do shell script "cal")cal 은 UNIX 커맨드에서 달력을 표시해주는 명령인데,
set the clipboard to the_text
이것을 이용한 것이다.
AppleScript로 이미지 리사이즈하는 코드 자동생성하기
image file을 resize하거나 rotate 하는 등의 코드는
자동 생성이 되므로 쉽게 짤 수 있다.
filename 을 선택하고 오른클릭 해서
자동 생성이 되므로 쉽게 짤 수 있다.
set filechosen to choose file까지 입력한 후,
set filename_ to (filechosen as text)
set filename to POSIX path of filename_
filename 을 선택하고 오른클릭 해서
Image Manipulation > resize를 선택하면 다음과 같이 코드가 자동 생성된다.
set filechosen to choose file다음과 같이 percentage 로 resize 할수도 있다.
set filename_ to (filechosen as text)
set filename to POSIX path of filename_
tell application "Image Events"
set this_image to open filenameend tell
scale this_image to size 400
save this_image in filename
close this_image
scale this_image by factor 0.3
AppleScript에서 file path사용할 때 space 처리하는 법
일반 UNIX와 달리 맥에서는 space가 파일명에 들어가는데, 이를 처리하지 않으면 에러가 나게 된다.
예를 들어 다음과 같이 하면 스페이스가 있는 파일명에서는 에러가 난다.
예를 들어 다음과 같이 하면 스페이스가 있는 파일명에서는 에러가 난다.
set ls_result to (do shell script "ls -l " & filename)따라서 다음과 같이 quoted form 을 써줘야 한다.
display dialog ls_result
set ls_result to (do shell script "ls -l " & quoted form of filename)예 : 다음을 실행해볼것
display dialog ls_result
set filechosen to choose file
set filename_ to (filechosen as text)
set filename to POSIX path of filename_
display dialog filename
set ls_result to (do shell script "ls -l " & quoted form of filename)
display dialog ls_result
AppleScript에서 dialog box로 파일 선택하기
다음과 같이 하면 된다.
set filechosen to choose file
set filename_ to (filechosen as text)
set filename to POSIX path of filename_
display dialog filename
AppleScript에서 UNIX shell 명령 실행하기
다음과 같이 하면
Terminal에 결과를 띄우려면 다음과 같이 한다.
다음은 ls한 것을 Grep을 사용해서 "Adobe"라는 이름이 들어간 어플리케이션들을
reverse alphabetical order 로 정렬해서 보여주는 스크립트이다.
http://homepage.mac.com/swain/Macinchem/Applescript/AppScript_tut/AppScrip_tut_2/appscript_tut_2.htm
do shell script "echo $PATH"AppleScript Editor의 아래쪽에 결과가 나온다.
Terminal에 결과를 띄우려면 다음과 같이 한다.
set the_shell_script to "echo $PATH"activate 는 명시적으로 안해줘도 Terminal이 뜬다.
tell application "Terminal"
end tellactivatedo script the_shell_script
다음은 ls한 것을 Grep을 사용해서 "Adobe"라는 이름이 들어간 어플리케이션들을
reverse alphabetical order 로 정렬해서 보여주는 스크립트이다.
set a to "Macintosh HD:Applications:"do shell script 에서는 다음과 같이 결과가 텍스트로 얻어진다.
set p to POSIX path of a
set the_text to (do shell script "ls " & p & "| grep Adobe | sort -r")
display dialog the_text
set the_text to (do shell script "cal")레퍼런스 :
set the clipboard to the_text
http://homepage.mac.com/swain/Macinchem/Applescript/AppScript_tut/AppScrip_tut_2/appscript_tut_2.htm
AppleScript 쉽게 짜는 법
AppleScript Editor에서 오른버튼 클릭하면 Popup menu 가 나오는데 이걸 선택하면
아래부분에 if.. else 문이라던가
파일들을 다 찾는 for loop 같은 것을 자동으로 생성할 수 있게 되어 있다.
아래부분에 if.. else 문이라던가
파일들을 다 찾는 for loop 같은 것을 자동으로 생성할 수 있게 되어 있다.
Saturday, March 20, 2010
AppleScript의 File Path 포맷과 UNIX의 POSIX 포맷변환
애플스크립트에서 file path는 :로 구분하지만
유닉스에서는 /로 구분하므로(POSIX방식),
이를 변환해주는 것이 필요하다.
애플스크립트 포맷에서 UNIX포맷으로 변환하기
AppleScript Editor에서 다음 예제를 실행해보자.
다음 example도 실행해보자.
http://homepage.mac.com/swain/Macinchem/Applescript/page2.html
http://homepage.mac.com/swain/Macinchem/Applescript/AppScript_tut/AppScrip_tut_2/appscript_tut_2.htm
유닉스에서는 /로 구분하므로(POSIX방식),
이를 변환해주는 것이 필요하다.
애플스크립트 포맷에서 UNIX포맷으로 변환하기
AppleScript Editor에서 다음 예제를 실행해보자.
set a to "Macintosh HD:Applications:Utilities:" -- Mac file path기타:
set p to POSIX path of a -- Convert to POSIX path
set the_text to (do shell script "ls " & p)
display dialog the_text
set a to "Macintosh HD:Applications:Utilities:"UNIX포맷에서 애플스크립트 포맷으로 변환하기
대신
set a to ":Applications:Utilities:"
로 해도 된다.
다음 example도 실행해보자.
set this_file to choose file보충:
set this_file_text to (this_file as text)
display dialog this_file_text
set posix_this_file to POSIX path of this_file
display dialog posix_this_file
set this_file_back to (POSIX file posix_this_file) as string
display dialog this_file_back
set this_file_back to (POSIX file posix_this_file) as string레퍼런스:
대신
set this_file_back to (posix_this_file as POSIX file) as string
로 해도 된다.
http://homepage.mac.com/swain/Macinchem/Applescript/page2.html
http://homepage.mac.com/swain/Macinchem/Applescript/AppScript_tut/AppScrip_tut_2/appscript_tut_2.htm
AppleScript 를 공부하고 싶은데, 어떤 tutorial을 보면 좋은가?
질문 : AppleScript 를 공부하고 싶은데, 어떤 자료를 보면 좋은가?
답 : 좋은 튜토리얼들은 다음과 같다.
다음은 화학 관련 분야의 사람이 쓴 튜토리얼인데 설명이 잘돼있다
(뒷부분은 화학 분야에 특화되어 있어서 비추).
Tutorial : AppleScript for Scientists
여기로 가서 맨 위의 Applescript for Scientists Tutorials 를 클릭하면 된다.
Tutorial : AppleScript for Scientists 의 Table of Contents
1 Getting Started
2 Path and Shell
3 Reading, Writing and using Lists
...
다음 튜토리얼도 알기 쉽다.
http://www.atpm.com/9.06/roll.shtml
그리고 다음 튜토리얼은 이미지 관련 스크립트 짜는 법을 설명하고 있는데, 이것도 좋다.
http://www.mactech.com/articles/mactech/Vol.21/21.03/BasicImageManipulation/index.html
AppleScript Essentials-Performing Basic Image Manipulation...Using Your Existing Software!
다음은 파일 읽고 쓰기 등 잘 설명된 튜토리얼
Read and write text files with AppleScript
기타 참고자료:
다음은 위키피디아의 애플스크립트의 개요.
http://en.wikipedia.org/wiki/AppleScript
AppleScript Tutorial: Display Dialog and Returning Values
http://applescripts.thompson-solutions.com/applescript_tutorials_Basic_Advanced.php
AppleScript Tutorial
http://www.tandb.com.au/applescript/tutorial/
http://www.tandb.com.au/applescript/tutorial/03/
Application 을 AppleScript 로 제어하는 것 관련해서 잘 나온것:
http://www.cvc.sunysb.edu/323/AppleScript/AppleScript.html
(즉 윈도우를 닫는다거나 등등)
기타 AppleScript 관련 블로그 및 자료 등
Alec's Web Log
AppleScript for Python Programmers
REALbasic City - Introduction to AppleScript
각종 AppleScript 모음. 양은 방대하지만 search에 좀 어려움이 있음
http://macscripter.net/viewforum.php?id=2
AppleScript 관련 개발자 블로그.
hasseg.org
Commands Reference
답 : 좋은 튜토리얼들은 다음과 같다.
다음은 화학 관련 분야의 사람이 쓴 튜토리얼인데 설명이 잘돼있다
(뒷부분은 화학 분야에 특화되어 있어서 비추).
Tutorial : AppleScript for Scientists
여기로 가서 맨 위의 Applescript for Scientists Tutorials 를 클릭하면 된다.
Tutorial : AppleScript for Scientists 의 Table of Contents
1 Getting Started
2 Path and Shell
3 Reading, Writing and using Lists
...
다음 튜토리얼도 알기 쉽다.
http://www.atpm.com/9.06/roll.shtml
그리고 다음 튜토리얼은 이미지 관련 스크립트 짜는 법을 설명하고 있는데, 이것도 좋다.
http://www.mactech.com/articles/mactech/Vol.21/21.03/BasicImageManipulation/index.html
AppleScript Essentials-Performing Basic Image Manipulation...Using Your Existing Software!
다음은 파일 읽고 쓰기 등 잘 설명된 튜토리얼
Read and write text files with AppleScript
기타 참고자료:
다음은 위키피디아의 애플스크립트의 개요.
http://en.wikipedia.org/wiki/AppleScript
AppleScript Tutorial: Display Dialog and Returning Values
http://applescripts.thompson-solutions.com/applescript_tutorials_Basic_Advanced.php
AppleScript Tutorial
http://www.tandb.com.au/applescript/tutorial/
http://www.tandb.com.au/applescript/tutorial/03/
Application 을 AppleScript 로 제어하는 것 관련해서 잘 나온것:
http://www.cvc.sunysb.edu/323/AppleScript/AppleScript.html
(즉 윈도우를 닫는다거나 등등)
기타 AppleScript 관련 블로그 및 자료 등
Alec's Web Log
AppleScript for Python Programmers
-> AppleScript 기본이 되면, 이것이 아마 가장 유용한 레퍼런스일 것이다.
http://devdaily.com/REALbasic City - Introduction to AppleScript
각종 AppleScript 모음. 양은 방대하지만 search에 좀 어려움이 있음
http://macscripter.net/viewforum.php?id=2
AppleScript 관련 개발자 블로그.
hasseg.org
Commands Reference
This chapter describes the commands available to perform actions in AppleScript scripts. For information on how commands work, see “Commands Overview.”
The commands described in this chapter are available to any script—they are either built into the AppleScript language or added to it through the standard scripting additions (described in “Scripting Additions”).
-> display dialog 즉 messagebox 에 대한 내용이 잘 나와 있어서 매우 유용.
이미지를 리사이즈해주는 애플스크립트
일단 링크만 걸어둠 :
Drag-and-drop script to quickly resize any image System
애플스크립트 에디트하는 법 :
애플스크립트는 .scpt 확장자로 저장한 텍스트파일에 저장하면 되는데
.scpt 은 기본적으로 애플스크립트 에디터에서 에디트하게 된다.
이것을 에디터에서 어플리케이션 포맷(.app) 으로 저장해주면,
더블클릭이나 드래그앤 드롭으로 실행 가능한 스크립트가 된다.
레퍼런스 : http://capucapu-blog.blogspot.com/2010/03/blog-post_20.html
Drag-and-drop script to quickly resize any image System
애플스크립트 에디트하는 법 :
애플스크립트는 .scpt 확장자로 저장한 텍스트파일에 저장하면 되는데
.scpt 은 기본적으로 애플스크립트 에디터에서 에디트하게 된다.
이것을 에디터에서 어플리케이션 포맷(.app) 으로 저장해주면,
더블클릭이나 드래그앤 드롭으로 실행 가능한 스크립트가 된다.
레퍼런스 : http://capucapu-blog.blogspot.com/2010/03/blog-post_20.html
Wednesday, March 17, 2010
mpc 파일을 mp3 로 변환하기
질문:
맥에서 mpc 파일을 플레이하고 싶은데, 방법이 없는가?
답:
VLC에서 플레이가 되긴 하지만, 현재 버전에서는 한곡을 재생한후 다운되는 버그가 있다.
따라서 mpc 파일을 aiff 또는 wav 로 convert 하는 방법을 추천한다.
사용하기 좋은 유틸리티로는 mppdec 가 있다 (Terminal에서 실행)
굳이 mp3로 변환하려면 aiff 를 mp3 로 변환하면 되지만,
aiff 로 이미 변환이 되어 있다면 플레이가 잘 되므로 그럴 필요는 없을 것이다.
설명 : mppdec 사용법
mppdec과 mpc 파일들이 같은 폴더에 있다고 가정하고, 다음과 같이 실행하면 된다.
https://wincent.com/wiki/Converting_MPC_audio_files_to_MP3
http://www.musepack.net/index.php?pg=osx
맥에서 mpc 파일을 플레이하고 싶은데, 방법이 없는가?
답:
VLC에서 플레이가 되긴 하지만, 현재 버전에서는 한곡을 재생한후 다운되는 버그가 있다.
따라서 mpc 파일을 aiff 또는 wav 로 convert 하는 방법을 추천한다.
사용하기 좋은 유틸리티로는 mppdec 가 있다 (Terminal에서 실행)
굳이 mp3로 변환하려면 aiff 를 mp3 로 변환하면 되지만,
aiff 로 이미 변환이 되어 있다면 플레이가 잘 되므로 그럴 필요는 없을 것이다.
설명 : mppdec 사용법
mppdec과 mpc 파일들이 같은 폴더에 있다고 가정하고, 다음과 같이 실행하면 된다.
./mppdec --aiff *.mpc .레퍼런스 :
https://wincent.com/wiki/Converting_MPC_audio_files_to_MP3
http://www.musepack.net/index.php?pg=osx
Sunday, March 14, 2010
Mac OS X에서 .7z 압축파일 풀기
질문 : Mac OS X에서 .7z 와 같이 자주 안쓰이는 압축파일을 풀려면 어떤 유틸리티가 좋은가?
답 : Stuffit Expander를 쓰면 된다.
다운로드 :
http://www.stuffit.com/mac/expander.html
답 : Stuffit Expander를 쓰면 된다.
다운로드 :
http://www.stuffit.com/mac/expander.html
Mac OS X에서 .bin/.cue 어떻게 쓰나
질문 : .bin/.cue 을 맥에서 쓸수 없는데 어떻게 하나?
답 : bchunker (BinChunker) 를 이용해서 .iso 로 변환한다.
다음 링크에서 다운받으면 된다.
Convert .bin + .cue -> .iso on Mac OSX
다음 링크에도 있긴 한데 왜인지 zip 이 안풀림
Convert .bin/.cue to .iso on Mac OSX
BinChunker for OS X
인스톨
다운받아서 압축을 풀면 bchunk 라는 실행파일이 나오는데 이것을 /usr/bin/ 에 넣어준다.
커맨드 라인에서 한다면
sudo cp bchunk /usr/bin/
와 같이 카피해주면 된다.
사용법
다음과 같이 하면 된다.
bchunk myinputfile.bin myinputfile.cue myoutputfile
Troubleshooting
혹시 executable 하지 않으면 다음과 같이 해준다.
sudo chmod a+x /usr/bin/bchunk
Mac 에서 Perl 쓰기
맥 OS X 에는 Perl 이 기본적으로 깔려 있다.
별도로 세팅해줄 것은 없다.
In Unix, how can I replace a single string in a large number of files?
http://kb.iu.edu/data/afrk.html
Introduction to Perl for Mac OS X
http://www.mactech.com/articles/mactech/Vol.18/18.09/PerlforMacOSX/index.html
별도로 세팅해줄 것은 없다.
In Unix, how can I replace a single string in a large number of files?
http://kb.iu.edu/data/afrk.html
Introduction to Perl for Mac OS X
http://www.mactech.com/articles/mactech/Vol.18/18.09/PerlforMacOSX/index.html
Friday, March 5, 2010
The disk copy of " " was changed since you last opened or saved it. Do you want to save anyway?
질문 : 포토샵에서 작업중이던 파일을 저장하려고 하면 The disk copy of [파일명] was changed since you last opened or saved it. Do you want to save anyway? 라는 메시지가 자꾸 뜨는데 외부에서는 이 파일을 건드린 적이 없다. 왜 이런가?
답 : 간혹 특별한 이유 없이 이런 문제가 생기는데시스템의 하드가 거의 다 찼거나 시스템이 불안할 경우에 발생하는 것 같다. 이럴 경우 파일을 지워 하드를 비우고 시스템을 재시동해보면 증상이 사라질 것이다. (휴지통도 다 비워야 하는 것을 잊지 말자)
답 : 간혹 특별한 이유 없이 이런 문제가 생기는데시스템의 하드가 거의 다 찼거나 시스템이 불안할 경우에 발생하는 것 같다. 이럴 경우 파일을 지워 하드를 비우고 시스템을 재시동해보면 증상이 사라질 것이다. (휴지통도 다 비워야 하는 것을 잊지 말자)
Sunday, February 28, 2010
큰 파일 나누기
질문 : 용량이 커서 DVD하나에 다 못굽는 파일을 4기가 정도 크기로 자르고 싶은데, 어떻게 하면 되는가?
답1 : 여러 볼륨의 tar로 나눠 저장한다 .. 방법은 나중에 정리
답2 : split Unix command 를 사용한다 (tar 등을 쓰지 않는 방법)
예 :
test.AVI 라는 100메가짜리 동영상 파일을 30메가 단위로 자르고 싶다면 :
예(DVD에 구울 수 있는 용량으로 나누는 예) :
다음과 같이 split 한 후 구워서
부연 :
다음과 같이 해도 되고
원래대로 돌아오지 않게 된다. 따라서 원본파일의 용량을 파일명에 적어놓는것도 좋은 방법일것 같다.
설명 :
Split 사용법 :
레퍼런스 :
Can you divide big file into smaller parts?
Linux / Unix split command
답1 : 여러 볼륨의 tar로 나눠 저장한다 .. 방법은 나중에 정리
답2 : split Unix command 를 사용한다 (tar 등을 쓰지 않는 방법)
예 :
test.AVI 라는 100메가짜리 동영상 파일을 30메가 단위로 자르고 싶다면 :
split -b 30000000 test.AVI test_이렇게 하면 다음과 같이 4개의 파일로 나뉜다.
test_aa이들을 다시 합치려면
test_ab
test_ac
test_ad
cat test_a[a-d] > test.AVI하면 된다.
예(DVD에 구울 수 있는 용량으로 나누는 예) :
다음과 같이 split 한 후 구워서
split -b 4200000000 aBigMovieFile.mkv aBigMovieFile.mkv_자른 조각들을 다시 원래 파일로 합칠때는 다음과 같이 한다.
cat aBigMovieFile.mkv_a[a-z] > aBigMovieFile.mkv
부연 :
다음과 같이 해도 되고
cat test_aa test_ab test_ac test_ad > test.avi다음과 같이 해도 된다. 즉 [] 사용은 입력의 편이를 위한 것일 뿐이다.
cat test_a[a-b] test_a[c-d] > test.avi그런데 잘못해서 cat test_aa test_ab test_ac test_ad 에서 파일명을 잘못 적거나 하면
원래대로 돌아오지 않게 된다. 따라서 원본파일의 용량을 파일명에 적어놓는것도 좋은 방법일것 같다.
설명 :
Split 사용법 :
split -b 22 newfile.txt newwould split the file "newfile.txt" into three separate files called newaa, newab and newac each file the size of 22.
레퍼런스 :
Can you divide big file into smaller parts?
Linux / Unix split command
UNIX의 Tar command 사용방법
요약 :
묶을때는 해당 디렉토리로 가서 다음과 같이 한다.
설명 :
1. 묶을때
파일들을 묶을때 :
다만 해본 결과 묶을때 drag and drop 으로 묶을 폴더의
전체 패스를 넣으면 나중에 패스가 이상하게 풀려나옴.
예를 들어 /Users/mimi/myMusic/ 을 묶은 후
/Users/kiki/myMusic/ 에다가 풀면
/Users/kiki/myMusic/Users/mimi/myMusic/
와 같이 풀려버리는 것이다.
따라서 묶을때는 항상 현재 디렉토리로 가서 묶도록 한다.
2. 풀때
Tar를 풀때 :
레퍼런스 :
http://www.linfo.org/tar.html
묶을때는 해당 디렉토리로 가서 다음과 같이 한다.
tar -cvf t.tar *풀때는 풀리는 디렉토리명이 기존 것과 겹치지 않게 주의하고 다음과 같이 한다.
tar -xvf t.tar
설명 :
1. 묶을때
파일들을 묶을때 :
tar -cvf file.tar file1 file2 file3디렉토리들을 묶을때 :
tar -cvf dir.tar dir1 dir2현재 디렉토리의 모든 것을 묶을 때 :
tar -cvf dir.tar *
다만 해본 결과 묶을때 drag and drop 으로 묶을 폴더의
전체 패스를 넣으면 나중에 패스가 이상하게 풀려나옴.
예를 들어 /Users/mimi/myMusic/ 을 묶은 후
/Users/kiki/myMusic/ 에다가 풀면
/Users/kiki/myMusic/Users/mimi/myMusic/
와 같이 풀려버리는 것이다.
따라서 묶을때는 항상 현재 디렉토리로 가서 묶도록 한다.
2. 풀때
Tar를 풀때 :
tar -xvf file.tar다음과 같이 해도 됨
tar xopf foo.tar풀때는 먼저 주의할점이 있는데, 풀리는 디렉토리명이 기존 디렉토리와 겹치지 않도록 할 것 (중요)
레퍼런스 :
http://www.linfo.org/tar.html
Saturday, February 27, 2010
Drag and drop을 cancel하는 법
질문 :
파일을 드래그 하다가 어디로 옮겨야되는지 잊어버렸다.
그런데 여기서 그냥 마우스를 release하면 엉뚱한 위치로 파일이 가버릴것인데
드래그 상태에서 drag & drop을 취소하려면 어떻게 해야 하나?
답 :
맨 위의 menu bar로 drop하면 된다.
레퍼런스 :
http://en.wikipedia.org/wiki/Drag-and-drop
파일을 드래그 하다가 어디로 옮겨야되는지 잊어버렸다.
그런데 여기서 그냥 마우스를 release하면 엉뚱한 위치로 파일이 가버릴것인데
드래그 상태에서 drag & drop을 취소하려면 어떻게 해야 하나?
답 :
맨 위의 menu bar로 drop하면 된다.
레퍼런스 :
http://en.wikipedia.org/wiki/Drag-and-drop
Friday, February 26, 2010
매직 마우스 배터리 수명
질문 :
Magic Mouse 의 배터리 수명이 매우 짧은 것 같은데 어떻게 해야 하나?
답 :
리튬 배터리를 사용하면 오래 간다고 함.
레퍼런스 :
Magic Mouse battery only lasts 30 days?
Apple has Energizer alkaline batteries pre-installed, so they won't last too long. I've had my mouse for almost 3 weeks, and the batteries are down to 66% right now. As soon as they're done, I'll replace them with lithium batteries. With my old Mighty Mouse, one lithium battery would usually last me about 3 months.
Thursday, February 25, 2010
앱스토어 게임 구매 위해 미국/홍콩 계정 만드는 방법
앱스토어 계정 만들어서 아이폰 100% 활용하기
1. 앱스토어가 무엇인가요?
2. 앱스토어 계정이 필요한 이유
+ 국가별 앱스토어 계정이 필요한 이유
3. 앱스토어 국가별 계정 만들기
+ 아이튠즈 앱스토어에서 국가 변경하기
+ 앱스토어 계정 생성하기
키워드 : App Store, iPhone
1. 앱스토어가 무엇인가요?
2. 앱스토어 계정이 필요한 이유
+ 국가별 앱스토어 계정이 필요한 이유
3. 앱스토어 국가별 계정 만들기
+ 아이튠즈 앱스토어에서 국가 변경하기
+ 앱스토어 계정 생성하기
키워드 : App Store, iPhone
Windows용 게임 데이터로 사용된 .dds 파일을 맥에서 다루려면
질문 : 윈도우용 게임 데이터로 사용된 .dds 파일을 맥에서 읽고 싶은데, 어떻게 하나?
또는, 일반 그래픽 파일들을 .dds 파일로 만드는 것을 맥에서 하고 싶은데, 어떻게 하나?
답 : Aorta 를 쓰면 된다.
이 툴을 쓰면 dds 에서 png 포맷으로 변환할 수도 있고,
일반 그래픽 파일로 dds를 만드는 것도 가능하다.
키워드 : game, graphics, data, converter
또는, 일반 그래픽 파일들을 .dds 파일로 만드는 것을 맥에서 하고 싶은데, 어떻게 하나?
답 : Aorta 를 쓰면 된다.
이 툴을 쓰면 dds 에서 png 포맷으로 변환할 수도 있고,
일반 그래픽 파일로 dds를 만드는 것도 가능하다.
키워드 : game, graphics, data, converter
Sunday, February 21, 2010
외장하드를 FAT32로 포맷하는 방법
질문 : 맥과 PC 사이의 파일공유 문제로 external hard drive를 NTFS가 아닌 FAT32로 포맷하고자 한다. 그런데 윈도우XP에서 드라이브에 오른클릭하면 NTFS포맷만 옵션으로 뜬다. 어떻게 해야 하나?
답 :
DOS prompt 에서 하면 된다.
예를 들어 포맷하고자 하는 드라이브가 F: 라고 하면
대용량의 경우 :
만약 1테라가 넘는 용량을 포맷하려 하면
레퍼런스 :
How to format external hard drive to FAT32 in Windows
Trying to format a large external USB or Firewire hard drive to the FAT32 file system?
(중략)
Windows can format a drive that is larger than 32GB in FAT32, but you have to use the DOS command prompt. However, if you have a drive that is 1TB or larger, you may still get an error saying “The volume is too big for FAT32”.
In that case, you can use a free program called SwissKnife that will allow you to format an external hard drive that is up to 2TB in size.
답 :
DOS prompt 에서 하면 된다.
예를 들어 포맷하고자 하는 드라이브가 F: 라고 하면
format /FS:FAT32 F:를 하면 된다.
대용량의 경우 :
만약 1테라가 넘는 용량을 포맷하려 하면
“The volume is too big for FAT32”라는 에러가 나는데 이런 경우 SwissKnife 라는 공짜 유틸리티를 이용하면 2TB 까지도 포맷할 수 있다.
레퍼런스 :
How to format external hard drive to FAT32 in Windows
Trying to format a large external USB or Firewire hard drive to the FAT32 file system?
(중략)
Windows can format a drive that is larger than 32GB in FAT32, but you have to use the DOS command prompt. However, if you have a drive that is 1TB or larger, you may still get an error saying “The volume is too big for FAT32”.
In that case, you can use a free program called SwissKnife that will allow you to format an external hard drive that is up to 2TB in size.
iso 파일 만들기 (Nero Burning ROM 이용)
질문 : iso 파일은 어떻게 만드나?
답 : 디스크 버닝 툴로 굽되 output 을 이미지로 해주면 되는데 네로를 이용한 방법을 다음에 정리한다.
- Nero Express 실행
- 데이터 -> 데이터 CD 클릭
- 오른쪽에 "추가" 버튼을 클릭하고 원하는 파일을 추가
- 현재 레코더를 "Image Recorder [CD-R/RW]" 로 바꿔줌
- 굽기 버튼 클릭
- 파일형식을 Nero 이미지 파일 (*.nrg) 오른쪽에 V 클릭해서 "ISO 이미지 파일" 선택하고 "저장" 누름
- 이제 그 경로에 ISO 파일이 만들어지게 됨
Subscribe to:
Posts (Atom)